Software Engineering: A Modern Approach
1 Managing Branches with Git-flow, GitHub Flow, and TBD
In this article, we will present three strategies for working with branches in software projects. It’s an important and practical subject, as these strategies define the workflow that teams employ to implement new features or fix bugs, among other tasks.
1.1 Git-flow
Git-flow is a commonly used branch strategy proposed by Vincent Driessen in 2010 (link). The strategy primarily uses two permanent branches:
main—also known asmasterortrunk—is used to store code that is production-ready.developstores code with features that have been implemented, but haven’t undergone a final test, which is typically performed by a Quality Analyst (QA) team.
In addition, Git-flow proposes three temporary branches:
- Feature branches
- Release branches
- Hotfix branches
These branches are described below. They can be created using Git’s commands (see some examples here) or by using tools and plugins that provide macros to facilitate Git-flow adoption.
Feature Branches
These branches are created from develop before
developers start a new feature implementation. Once the implementation
is completed, they are merged back into develop and then
deleted. Typically, feature branches exist only in a developer’s local
repository.
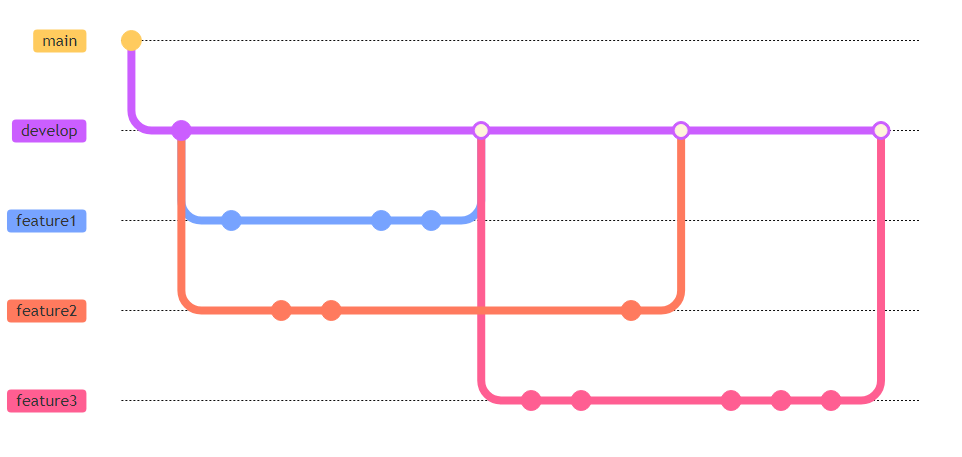
Example: The following figure illustrates three
feature branches. The full circles represent commits and
the empty circles represent merges. Note how feature
branches derive from and return to develop.

Release Branches
These branches also originate from develop. They are
used to prepare a new release, which must be approved by the customers.
Once the customer gives the green light, the release branches are
integrated into main as a new system version is ready for
deployment.
If changes occur during the approval process, the release branch
should also be merged back into develop.
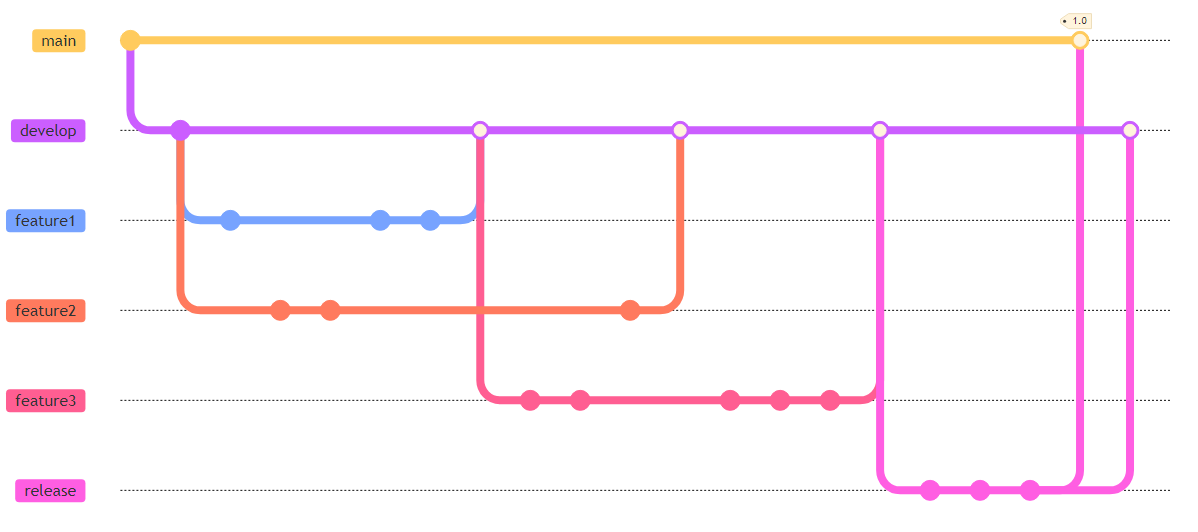
Example: After implementing the three features from
the previous figure, the team leader decides to generate a release 1.0.
For this purpose, they create a release branch (see figure) which is
used to perform the final changes to address customer requirements.
After these changes, the code is finally approved and deployed—i.e.,
integrated into main. Subsequently, the changes made on the
release branch are also applied to develop.

Hotfix Branches
These branches are used to fix a critical error detected in
production—that is, in code that’s in the main branch. They
originate from main, receive commits to fix the critical
bug, and are then re-integrated into main and
develop.
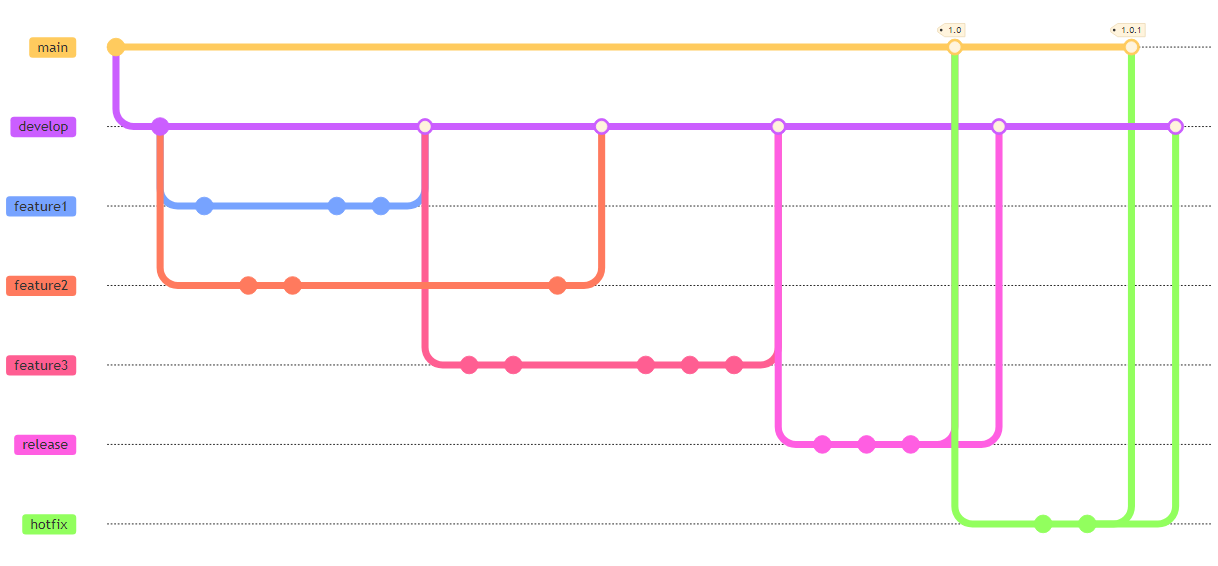
Example: After releasing the new version, users
report a critical bug. Thus, a branch is created to correct this
critical bug (see the following figure), originating from
main. After the bug fix, the branch is re-integrated into
main and a new release is generated with the tag 1.0.1.
Subsequently, the branch is also integrated into
develop.

Summary
In summary, the most common flow when using Git-flow is as follows:
Feature ⇒ develop ⇒ release ⇒ main
A feature is always implemented in a specific branch. This branch is
then merged into develop, where the feature undergoes
integration tests. Periodically, a release branch is created to present
a new system version to customers. Once approved, this version is
integrated into main and made available to all users.
Git-flow is most suitable when there are manual tests and QA teams, as well as when customers need to approve and validate each new version of the code before it goes into production.
However, when using Git-flow, feature branches may take a long time
to be integrated into develop, which may result in numerous
integration conflicts (merge hell). Additionally, if the
integration of release branches takes time, developers may have to to
wait longer to receive feedback on the new features they’ve
implemented.
1.2 GitHub Flow
GitHub Flow is a common branch model used with GitHub. It’s simpler than Git-flow as it primarily consists of the main branch and feature branches. It also provides support for code review before integration, through GitHub’s Pull Requests (PR) mechanism.
When using GitHub Flow, the main steps are as follows:
- A developer creates a branch in their local repository.
- The developer implements a feature or fixes a bug.
- The developer pushes the branch to GitHub.
- The developer creates a Pull Request (PR) on GitHub, requesting someone to review their implementation.
- A reviewer checks the new code and, if approved, merges the PR into
main.
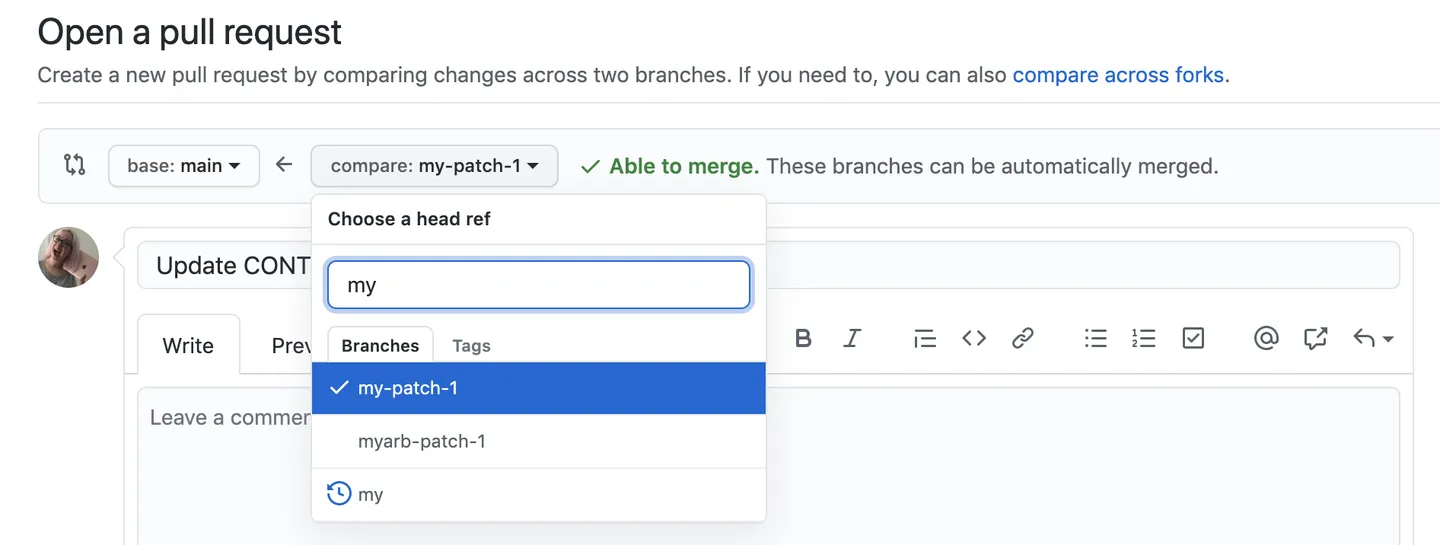
An example of a PR request is shown in the following figure, which is
extracted from GitHub’s documentation. In this figure, a PR is opened to
review the my-patch-1 branch. After the review is
completed, this branch will be integrated into main.

For a more detailed explanation of the Pull Request concept, refer to the appendix on Git.
GitHub Flow is primarily used in systems with only one production version, which is typically the case with web systems. A disadvantage of the model is that PRs can take a long time to be reviewed.
Despite its name, the same flow can be used with other version control services, such as GitLab.
1.3 Trunk-Based Development (TBD)
TBD is simpler than GitHub Flow as it uses only one branch—the
main branch, also known as master or
trunk.
While developers may create feature branches in TBD, these should have a limited duration of no more than two days, as suggested by Paul Hammant in his TBD book (and also in this post):
One key rule is the length of life of the branch before it gets merged and deleted. Simply put, the branch should only last a couple of days. Any longer than two days, and there is a risk of the branch becoming a long-lived feature branch (the antithesis of trunk-based development).
To implement TBD effectively, there should be a comprehensive suite
of unit and integration tests to avoid introducing bugs and regressions
in the main branch. Additionally, TBD facilitates the
adoption of practices such as Continuous Integration (CI) and Continuous
Deployment (CD).
For a more detailed description of TBD and an explanation of the feature flags mechanism, which is used to prevent incomplete feature implementations from going into production, refer to Chapter 10 of the book.
Check out the other articles on our site.
