Software Engineering: A Modern Approach
1 Git 🔗
The best way to learn Git is probably to first only do very basic things and not even look at some of the things you can do until you are familiar and confident about the basics. – Linus Torvalds
In this appendix, we introduce Git, the most widely used version control system today, and discuss examples of its use. Inspired by the quote above from Linus Torvalds, the creator of Git, we will focus on the basic concepts and commands of this system. As emphasized by the quote, it’s important to master these fundamental commands before exploring more advanced ones. If you’re not familiar with the objectives and services provided by a version control system, we recommend first reading the Version Control section in Chapter 10.
1.1 Init & Clone 🔗
To start using Git to manage the versions of a system, we must
execute one of the following commands: init or
clone. The init command creates an empty
repository. The clone command performs two actions: first,
it creates an empty repository; then, it copies all the commits from a
remote repository specified as a parameter into the newly created
repository. Here’s an example command:
git clone https://github.com/USER-NAME/REPO-NAME
This command clones a GitHub repository into the current directory.
We should opt for clone when working on a project that is
already underway and has commits on a central server. In this example,
GitHub serves as the central server.
1.2 Commit 🔗
Commits create snapshots (or pictures
) of a system’s files.
These snapshots are stored in the version control system in a compact
and efficient manner to minimize disk space usage. Later, we can
retrieve any of these snapshots. For example, we may want to restore an
old implementation of a specific file.
Developers should make commits periodically, especially after making significant changes to the code. In distributed version control systems such as Git, commits are initially stored in the developer’s local repository. This makes the cost of a commit minimal, allowing developers to make multiple commits throughout a working day. However, developers should avoid making large commits with substantial modifications to multiple files. Moreover, changes related to more than one maintenance task should not be included in the same commit. For example, fixing two bugs in the same commit is not advisable. Instead, each bug should be addressed in a separate commit. This practice simplifies code review, especially in cases where a customer complains that a particular bug has not been resolved.
Commits also contain metadata, including date, time, author, and a
message describing the changes introduced by the commit. The following
figure shows a GitHub page that displays the main metadata of a commit
from the google/guava repository. The commit refers to a
refactoring, which is evident from its title. The refactoring is then
explained in detail in the commit message. At the last line of the
figure, we can see the author’s name and information indicating that the
commit was made 13 days ago.

Also on the last line of the figure, we can see that every commit has a unique identifier, in this case:
1c757483665f0ba8fed31a2af7e31643a4590256
This identifier consists of 20 bytes, typically represented in hexadecimal format. It provides a checksum of the commit’s content, computed using the SHA-1 hash function.
1.3 Add 🔗
Locally, the Git system has three distinct areas:
A working directory, also called a working tree, is where project files are stored. It can include both tracked and untracked files.
The repository itself, which stores the commit history.
An intermediate area, called index or staging area, which temporarily stores the changes selected to be included in the next commit.
Among these areas, the developer directly accesses only the working
directory, which functions as a regular operating system directory. The
other two areas belong to Git and are managed exclusively by it. Like
any other directory, the working directory can contain various files.
However, only files added to the index via the git add
command are prepared for versioning by Git.
The index stores a snapshot of the file contents staged for the next
commit. Therefore, before executing a git commit, we must
first run a git add to save the file’s content to the
index. After this, we use git commit to store that version
in the local repository. This process is illustrated in the next
figure.

Example: Consider the following simple file, which
we’ll use to explain the add and commit
commands.
// file1
x = 10;
After creating this file, the developer executes:
git add file1
This command saves the current content of file1 (with
x = 10) in the index (or staging area). Immediately
afterward, the developer modifies the file again:
// file1
x = 20; // new value for x
Then the developer executes:
git commit -m "New value of x"
The -m flag provides the commit message. However,
because the user did not run add after changing the value
of x to 20, the commit will not include this most recent
change. Instead, Git will commit the version with x = 10,
which was the snapshot previously stored in the index.
To avoid this problem, developers often use:
git commit -a -m "New value of x"
The -a option instructs Git to stage all modifications
and deletions of tracked files before committing. Thus, the requested
commit includes the latest changes. However, -a does not
eliminate the need for git add entirely: it must still be
used at least once to start tracking a new file.
Just as there is an add command, there is also a command
to remove a file from a Git repository. For example:
git rm file1.txt
git commit -m "Removed file1.txt"
The git rm command stages the file’s removal and also
deletes it from the working directory.
1.4 Status, Diff & Log 🔗
The status command is one of the most frequently used
Git commands. It shows the state of the working directory and the index,
among other information. For example, it can display:
Files in the working directory that have been modified but not yet added to the index.
Files in the working directory that are not tracked by Git (not yet added).
Files staged in the index, waiting to be committed.
The git diff command highlights modifications made to
files in the working directory that have not yet been added to the
index. For each modified file, the command shows the lines that have
been added (+) and removed (-). Developers frequently use
git diff before add/commit
operations to check which changes are staged and which are not.
The git log command shows information about recent
commits, including the commit hash, date, author, and message.
1.5 Push & Pull 🔗
The push command copies the most recent commits from
the local repository to a remote repository. A push is used
when a developer wants to make new commits visible to other developers.
To update their local repositories, the other team members must use the
pull command. This command performs two main
operations:
First, a
pullcopies the most recent commits from the remote repository to the local repository. This operation is called fetch.Then, it updates the files in the working directory. This operation is called merge.
The following figure illustrates the functioning of the
push and pull commands.

Example: Assume that the central repository contains the following file:
void f() {
  ...
}
Imagine that two developers, Bob and Alice, each perform a
pull to copy this file into their local repositories and
working directories. The syntax is:
git pull
Later, Bob implements a second function g in this
file:
void f() {
  ...
}

void g() {   // by Bob
  ...
}
Next, Bob executes an add, commit, and
push. The syntax of the push command is:
git push origin main
The origin parameter is a default value used by Git to
indicate a remote repository, such as a GitHub repository. The
main parameter refers to the default branch. We’ll discuss
branches in more detail later.
After running the above push command, the new version of
the file is copied to the remote repository. A few days later, Alice
decides to modify the same file. Since she’s been away from the project
for a while, she should first execute a pull to update her
local repository and working directory with any recent changes, such as
the one made by Bob. After the pull, Alice’s local copy of
the file will include the function g implemented by
Bob.
1.6 Merge Conflicts 🔗
Merge conflicts occur when two or more developers modify the same section of the code simultaneously. Let’s examine an example to better understand this situation.
Example: Suppose Bob implements the following program:
main() {
  print("Helo, world!");
}
Upon completing the implementation, Bob executes an add,
followed by commit, and push.
Later, Alice performs a pull to retrieve the file
implemented by Bob. She then decides to translate the program’s message
into Portuguese.
main() {
  print("Olá, mundo!");
}
While Alice is making the translation, Bob notices that he misspelled
Hello
with only one l
. However, before Bob can make his
correction, Alice completes her changes and executes the trio of
commands add, commit, and
push.
Bob, after correcting the typo, executes an add and then
a commit. When he attempts to push, the
command fails with the following message:
Updates were rejected because the remote contains work that you do
not have locally. This is usually caused by another repository pushing
to the same ref. You may want to first integrate the remote changes
(e.g., git pull ...) before pushing again.
The message indicates that Bob cannot push because the
remote repository contains a new version of the file, pushed by Alice.
Bob needs to perform a pull first. However, when he does
this, he receives a new error message:
CONFLICT (content): Merge conflict in file2.
Automatic merge failed; fix conflicts and then commit the result.
This message clearly indicates a merge conflict in
file2. Upon opening this file, Bob sees that Git has
modified it to highlight, using special delimiters, the
conflict-generating lines:
main() {
 <<<<<<< HEAD
 print("Hello, world!");
 =======
 print("Olá, mundo!");
 >>>>>>> f25bce8fea85a625b891c890a8eca003b723f21b
 }
These modifications should be interpreted as follows:
The code between
<<<<<<< HEADand=======is Bob’s modification, who couldn’t execute apushand had to execute apull.HEADindicates that this code was modified in Bob’s most recent local commit.The code between
=======and>>>>>>> f25bce8 ...is Alice’s modification, who successfully executed thepush. The stringf25bce8...is the ID of the commit in which Alice modified this code.
Now, Bob must resolve the conflict by hand. He must choose which section of the code will prevail—his code or Alice’s—and edit the file accordingly, removing the delimiters inserted by Git.
Assuming Bob decides Alice’s code is correct, since the system is now using messages in Portuguese, he should edit the file to look like this:
main() {
  print("Olá, mundo!");
}
Note that Bob has removed the delimiters inserted by Git
(<<<<<<< HEAD , =======,
and >>>>>>> f25bce8...) as well as the
print command with the message in English. After editing
the code to its correct form, Bob should execute the commands
add, commit, and push again; this
time they will succeed.
This example demonstrates a simple conflict, confined to a single
line of a single file. However, a pull can cause more
complex conflicts. For instance, the same file may contain several
conflicts, or conflicts may span more than one file.
1.7 Branches 🔗
Git organizes the workspace into virtual folders, called
branches. So far, we have not discussed branches
because every repository includes a default branch, named
main, created by the init command. If we
do not concern ourselves with branches, all development will occur on
this branch. However, creating additional branches can often improve the
organization of development. To illustrate this concept, let’s explore
an example.
Example: Suppose Bob is responsible for maintaining
a certain feature of a system. For simplicity, let’s assume this feature
is implemented in a single function f. Bob has an idea to
completely change the implementation of f to use a more
efficient algorithm with a better data structure. This change will
require a few weeks of work. While optimistic, Bob is not sure if the
new implementation will deliver the gains he anticipates. Additionally,
during the new implementation, Bob might need to access the original
code of f, for example, to fix bugs reported by users.
This scenario presents an ideal opportunity for Bob to create a
branch to implement and test this new version of f in
isolation. To do this, he should use:
git branch f-new
This command creates a new branch named f-new, as long
as this branch does not already exist.
To switch from the current branch to a new branch, use
git checkout [branch-name]. To find the name of the current
branch, simply use git branch. This command lists all
branches and highlights the current one.
As mentioned earlier, we can conceptualize branches as virtual
subdirectories
within the working directory. The key distinction is
that branches are managed by Git, not by the operating system, making
them virtual in nature. Expanding on this analogy, the
git branch [name] command is akin to the
mkdir [name] command, but Git creates the branch and also
copies all the files from the parent branch to it. In contrast,
directories created by the operating system start empty. The
git checkout [name] command is similar to the
cd [name] command, while git status combines
aspects of both the ls and pwd commands.
Just as we can customize the operating system prompt to include
information about the current directory, a similar customization is
possible with Git branches. As a result, the prompt displayed by Git can
take, for example, the following form:
~/projects/systemXYZ/main.
However, there’s an important difference between branches and
directories. A developer can only switch the current branch from A to B
if they have saved their modifications to A, typically by executing
add and commit. If there are uncommitted
changes that would be overwritten by the switch,
git checkout B will fail, resulting in an error message
similar to this:
Your local changes to the following files would be overwritten by checkout
[list of files]
Please commit your changes or stash them before you switch branches.
Returning to the example, after Bob has created his branch, he must
proceed as follows. When he plans to work on the new implementation of
f, he should first switch the current branch to
f-new. On the other hand, when he needs to modify the
original code of f—the production code—he should ensure he
is on the main branch. Regardless of which branch he is
working on, Bob must use add and commit to
save his progress.
Bob will continue with this workflow, alternating between the
f-new and main branches until the new
implementation of f is completed. Once completed, Bob needs
to merge the new code into the original codebase. However, with the use
of branches, he no longer needs to perform this operation by hand. Git
provides a command called merge that handles this
integration automatically. The syntax is as follows:
git merge f-new
This command must be executed on the branch that will receive the
modifications from f-new. In our example, it should be run
on the main branch.
As the reader may anticipate, a merge can cause conflicts, also known
as integration conflicts. These conflicts occur when
both the receiving branch (main, in our example) and the
branch being merged (f-new, in our example) have modified
the same lines of code. As discussed in Section A.6, Git detects and
marks the conflict areas, leaving it up to the developer who initiated
the merge to resolve them, i.e., to choose the code that should
prevail.
After completing the merge, Bob can remove the f-new
branch if retaining the commit history of the new implementation is no
longer necessary. To delete f-new, he should execute the
following command while on the main branch:
git branch -d f-new
1.7.1 Commit Graphs 🔗
Commits may have zero, one, or more parents (or ancestors). As the following figure illustrates, the first commit of a repository does not have a parent. A merge commit, however, has two or more parents, representing the branches that were merged. For example, commit 10 in the figure has two parents. All other commits in this figure have exactly one parent.

A branch is simply an internal Git variable that contains the
identifier of the last commit made on that branch. There is also a
variable called HEAD, which points to the current branch.
More specifically, HEAD contains the name of the variable
that holds the identifier of the last commit on the current branch. For
instance:

In this example, there are two branches, represented by the
MAIN and ISSUE-45 variables. Each variable
points to the last commit on its respective branch. The
HEAD variable points to the MAIN variable,
indicating that the current branch is MAIN. If a new commit
is made, the graph changes as follows:

The new commit has the identifier 7. It was made on MAIN
because HEAD was pointing to this branch’s variable. The
parent of the new commit is the previous HEAD, commit 3.
The MAIN variable has moved forward to point to the new
commit. Consequently, if the branch remains unchanged, the parent of the
next commit will be commit 7.
However, if we switch to the ISSUE-45 branch, the graph
appears as shown in the following figure. The only change is that the
HEAD variable now points to ISSUE-45. This
change alone is sufficient to direct the next commit to this branch,
ensuring that this commit will have commit 6 as its parent.

1.8 Remote Branches 🔗
Up until now, we’ve been working with local branches, i.e., the
branches existed only in the local repository. However, it is also
possible to push a local branch to a remote repository. To
illustrate this feature, let’s use an example similar to the one in the
previous section.
Example: Suppose that Bob created a branch called
g-new to implement a new functionality. He made some
commits on this branch, and now he would like to share it with Alice so
she can collaborate on this new implementation. To achieve this, Bob
should use the following push command:
git push -u origin g-new
This command pushes the g-new branch to the remote
repository, referred to as origin by Git. The remote
repository can be, for instance, a GitHub repository. The
-u parameter indicates that, in the future, Git will
synchronize the two repositories using a pull (the
u refers to upstream). This syntax applies only to
the first push of a remote branch. In subsequent commands,
we can omit -u, i.e., just use
git push origin g-new.
In the remote repository, a g-new branch will be
created. To work on this branch, Alice must first create it on her local
machine and then associate it with the remote branch. To do this, she
should execute the following commands while on the main
branch:
git pull
git checkout -t origin/g-new
The first command makes the remote branch visible on Alice’s local
machine. The second command creates a local g-new branch,
which Alice will use to track changes from the remote branch. This is
indicated by the -t parameter, which stands for
tracking. Next, Alice can make commits to this branch. When she
is ready to publish her changes, she should execute a push,
using the usual syntax, i.e., without the -u parameter.
After that, Bob can execute a pull and may conclude that
the implementation of the new functionality is finished and ready to be
merged into the main branch. He can also delete the local
and remote branches using:
git branch -d g-new
git push origin --delete g-new
Alice can also delete her local branch by using:
git branch -d g-new
1.9 Pull Requests 🔗
Pull requests are a mechanism for reviewing and discussing a branch
before it is integrated into the main branch. When using
pull requests, a developer first implements new features in a separate
branch. Once this implementation is complete, they do not immediately
integrate the new code into the main branch. Instead, they
open a request for their branch to be reviewed and approved by another
developer. This request for review and integration is called a pull
request. Pull requests are common on GitHub, but similar mechanisms
exist in other version control systems.
Typically, the review and integration process takes place via a web
interface provided by platforms such as GitHub. Without this interface,
the reviewer would have to start their work by performing a
pull of the branch to their local machine. This is the
origin of the name: a pull request is a request for another developer to
review and integrate a specific branch. Without a web interface, the
reviewer would fulfill this request by performing a pull of
the branch.
In the following section, we will walk through the process of submitting and reviewing pull requests using an example.
Example: Bob and Alice are members of an
organization that maintains a repository called
awesome-git, which contains a list of interesting links
about Git. The links are stored in the README.md file in this
repository. Any member of the organization can suggest adding links to
this page. However, they cannot push directly to the
main branch. Instead, each suggestion needs to be reviewed
and approved by another team member.
Bob decides to suggest adding this appendix to the list. To do so, he
first clones the repository and creates a branch, named
se-book-appendix, using the following commands:
git clone https://github.com/aserg-ufmg/awesome-git.git
git branch se-book-appendix
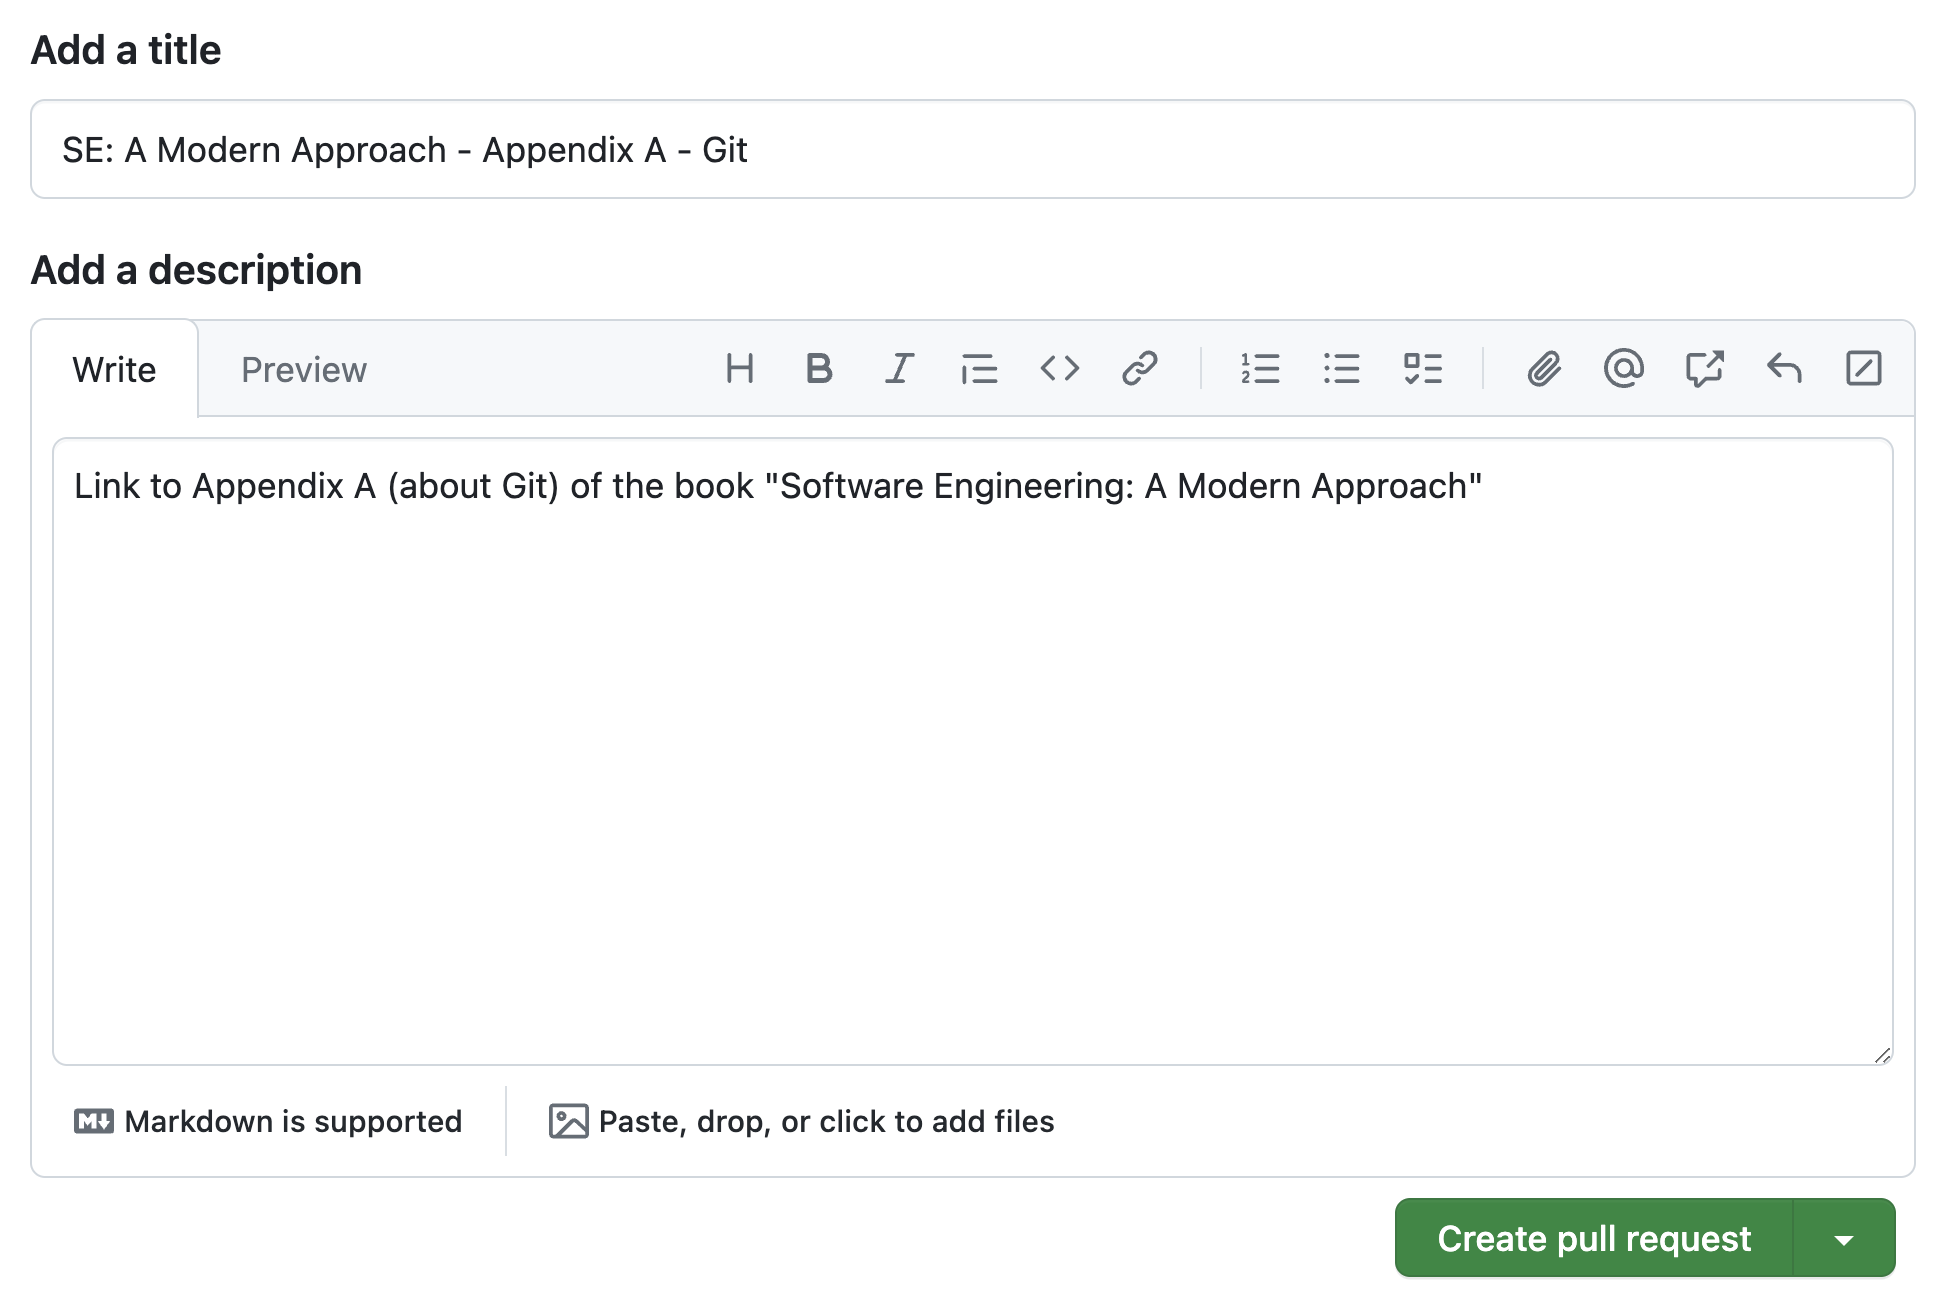
Next, Bob edits the README.md file, adding the URL of this appendix.
He then performs an add, commit, and pushes
the branch to GitHub:
git add README.md
git commit -m "SE: A Modern Approach - Appendix A - Git"
git push -u origin se-book-appendix
The steps described so far are similar to those presented in the
previous section, but the process diverges from here. First, Bob needs
to go to the GitHub page and select the se-book-appendix
branch. GitHub then displays a button to create a pull request. Bob
clicks on this button and describes his pull request, as shown in the
following figure.
A pull request is a request for another developer to review and, if
appropriate, merge a branch that has been created. Consequently, pull
requests are a way for an organization to conduct code
reviews. In this case, developers do not directly integrate
their code into the remote repository’s main branch.
Instead, they request that other developers first review their code and
then merge it.
On GitHub’s pull request creation page, Bob can invite Alice to
review his code. She will then be notified that there is a pull request
waiting for review. Through GitHub’s interface, Alice can review the
commits in Bob’s pull request. For example, she can inspect a diff
between the new and old code. If necessary, Alice can exchange messages
with Bob to clarify any questions about the code. She can also request
changes to the proposed code. In such a case, Bob needs to implement the
changes and perform a new add, commit, and
push. The new commits will be automatically added to the
pull request, allowing Alice to verify if her requests have been
addressed. Once all modifications are approved, Alice can merge the code
into the main branch by clicking a button on the pull
request review page.
1.10 Squash 🔗
Squash is a Git command that merges several commits into a single commit. It is often recommended, for example, before submitting pull requests.
Example: In the previous example, suppose the pull
request created by Bob has five commits. Specifically, he is suggesting
the addition of five new links to the awesome-git
repository, which he collected over a few weeks. After discovering each
link, Bob performed a commit on his machine. He planned to create the
pull request only after accumulating five commits.
However, to facilitate Alice’s review of his pull request, Bob decides to merge the five commits into a single one. This way, instead of analyzing five commits, Alice will review only one. The submitted modification remains exactly the same, i.e., it consists of adding five links to the page. However, instead of the changes being spread across five commits, they are now consolidated into a single commit.
To perform a squash, Bob should execute the following command:
git rebase -i HEAD~5
The number 5 indicates that he intends to merge the last five commits of the current branch. After executing this command, Git opens a text editor with a list containing the ID and description of each commit, as shown below:
pick 16b5fcc Including link 1
pick c964dea Including link 2
pick 06cf8ee Including link 3
pick 396b4a3 Including link 4
pick 9be7fdb Including link 5
Bob should use the editor to replace the word pick
with
squash
on all lines except the first one. The file will then look
like this:
pick 16b5fcc Including link 1
squash c964dea Including link 2
squash 06cf8ee Including link 3
squash 396b4a3 Including link 4
squash 9be7fdb Including link 5
After saving and closing the file, Git automatically opens a new editor for Bob to enter the message for the new commit—that is, the commit that will merge the five listed commits. After providing this message, Bob saves the file, and the squash operation is complete.
1.11 Forks 🔗
A fork is a mechanism provided by GitHub to clone a remote
repository, i.e., one stored on GitHub. A fork is performed via GitHub’s
web interface. On the page of any repository, there is a button to fork
the repository. If we fork the torvalds/linux repository, a
copy of this repository will be created in our GitHub account, named,
for example, mtov/linux.
As in previous sections, let’s use an example to explain this operation.
Example: Consider the
aserg-ufmg/awesome-git repository, used in the example
about pull requests. Now, let’s introduce a third developer, named
Carol. However, Carol is not a member of the ASERG/UFMG organization, so
she doesn’t have permission to perform a push in this
repository, as Bob did in the previous example. However, Carol has
identified an important and interesting link that she believes is
missing from the current list, and she would like to suggest adding it.
However, recall that Carol cannot follow the same steps used by Bob in
the previous example, as she doesn’t have permission to
push to the repository in question.
To solve this problem, Carol should start by forking the repository.
She simply needs to click on the fork button on the repository’s GitHub
page. After forking, she will have a new repository in her GitHub
account, named carol/awesome-git. She can then clone this
repository to her local machine, create a branch, add the link she wants
to the list, and perform an add, commit, and
push. This last operation will be carried out on the forked
repository. Finally, Carol should go to the page of the forked
repository and create a pull request. Since the repository is a fork,
she has an extra option: directing the pull request to the original
repository. The developers of the original repository, such as Bob and
Alice, will then be responsible for reviewing and, if appropriate,
accepting the pull request.
In summary, a fork is a mechanism that, when combined with pull requests, allows an open-source project to receive contributions from external developers. Specifically, an open-source project can receive contributions not only from its core team of developers (Bob and Alice, in our example) but also from any other developer with a GitHub account (like Carol).
Bibliography 🔗
Scott Chacon, Ben Straub. Pro Git. 2nd edition, Apress, 2014.
Rachel M. Carmena. How to teach Git. Blog post (link).
Exercises 🔗
Replicate each of the examples presented in this appendix. For examples involving remote repositories, use a GitHub repository. For examples involving two users (Alice and Bob), create two local directories and use them to simulate each user’s actions.
This book was formatted using Pandoc to convert Markdown to LaTeX,
which was then used to generate a PDF file. The fonts used are Bitstream
Charter for text and Beramono for code, both at 11pt. The
EPUB and HTML versions were also generated from the same Markdown files
with Pandoc.