Software Engineering: A Modern Approach
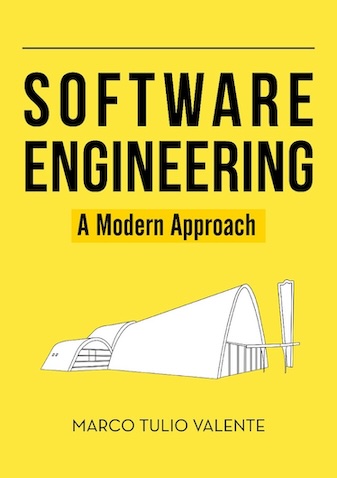
8 Testing 🔗
Code without tests is bad code. – Michael Feathers
This chapter begins with an introduction to testing, discussing the test pyramid and the main types of automated tests (Section 8.1). We then present the basic concepts of unit tests (Section 8.2), the principles for writing such tests (Section 8.3), test coverage (Section 8.4), the importance of having designs that promote testability (Section 8.5), and mock objects, which are used to enable the implementation of unit tests (Section 8.6). In Section 8.7, we present the concept of Test-Driven Development (TDD). Next, we address the tests at the top of the test pyramid, specifically integration tests (Section 8.8) and end-to-end tests (Section 8.9). The chapter concludes with Section 8.10, which provides a brief overview of other types of tests, including black-box and white-box tests, acceptance tests, and non-functional requirement tests.
8.1 Introduction 🔗
Software is one of the most complex human constructs, as discussed in Chapter 1. Thus, it is understandable that software systems are susceptible to various kinds of bugs and inconsistencies. To prevent such bugs from reaching customers and causing damage, it is important to integrate testing activities into software projects. Indeed, testing is one of the most valued programming practices today across all types of software. It is also one of the practices that has undergone the most transformations in recent years.
In traditional Waterfall development, tests were conducted in a separate phase following the requirements, analysis, design, and implementation phases. Moreover, a separate test team was responsible for verifying that the implementation met the defined requirements. To perform this verification, tests were often manual, meaning a person used the system, provided some input, and checked whether the outputs were as expected. The primary goal of such tests was to detect bugs before the system went into production.
With the advent of agile methods, testing has been profoundly revised, as follows:
A large part of testing activities has been automated; in other words, in addition to implementing the system’s classes, developers now write code to test these classes. Thus, programs have become self-testable.
Tests are no longer performed only after implementing the system’s classes. In fact, they can be implemented even before the classes themselves are written.
Large test teams no longer exist—or they are responsible for specific tests. Instead, the developer who implements a class is also responsible for writing its tests.
Tests are no longer used only for detecting bugs. While this is still important, tests have gained new roles, such as verifying whether a class continues to work after a bug is fixed in another part of the system. Furthermore, tests now also help to document the production code.
These transformations have made testing one of the most valued programming practices in modern software development. It is in this context that we should understand Michael Feathers’ quote that opens this chapter: if code does not have tests, it can be regarded as having low quality or even as being legacy code.
In this chapter, we will focus on automated tests because manual tests are time-consuming, error-prone, and expensive. Moreover, they must be repeated every time the system undergoes a modification.
An interesting way to classify automated tests is through a test pyramid, originally proposed by Mike Cohn (link). As shown in the next figure, this pyramid partitions the tests according to their granularity.

Automated tests are typically categorized into three groups. Unit tests check small parts of the code, usually a single class (see also the next figures). They form the base of the pyramid, meaning most tests fall into this category. Unit tests are simple, easier to implement, and fast to run. At the next level, we have integration tests or service tests that verify a system’s functionality or transaction. These tests involve multiple classes from different packages and may include external components like databases. They require more time to implement and are slower to run. Lastly, at the top of the pyramid, we have end-to-end tests, also referred to as user interface tests or system tests. They simulate a user session on the system as realistically as possible. For this reason, they are more complex, time-consuming, and fewer in number. End-to-end tests also tend to be brittle, meaning minor changes in the user interface might require modifications in these tests.


A generic recommendation suggests that automated tests should be implemented in the following proportion: 70% as unit tests; 20% as integration tests; and 10% as end-to-end tests (link, Chapter 3).
In this chapter, we will study the three types of tests included in the test pyramid. However, we’ll focus more on unit tests than on the other types, as they are much more prevalent. Before we proceed, we would like to revisit two concepts introduced in Chapter 1. A piece of code is said to have a defect—or a bug, more informally—when it does not comply with the specification. If defective code is executed and causes the program to produce an incorrect result or behavior, we say that a failure has occurred.
8.2 Unit Testing 🔗
Unit tests are automated tests that focus on small units of code, typically classes, which are tested in isolation from the rest of the system. A unit test is a program that calls methods from a class and checks if they return the expected results. When adopting unit tests, the code can be divided into two parts: a set of classes—which implement the system’s requirements—and a set of tests, as illustrated in the following figure.

The figure shows a system with n classes and m tests. As can be observed, there isn’t a one-to-one correspondence between classes and tests. For instance, a class might have more than one test. This is the case for class C1, which is tested by T1 and T2. This probably occurs because C1 is an important class that needs to be tested in different contexts. In contrast, C2 doesn’t have tests, either because the developers forgot to implement them or because it’s a less important class.
Unit tests are implemented using frameworks specifically designed for this purpose. The most well-known framework family is called xUnit frameworks, where the x designates the language used in the implementation of the tests. The first of these frameworks, called sUnit, was implemented by Kent Beck in the late 1980s for Smalltalk. In this chapter, our tests are implemented in Java, using JUnit. The first version of JUnit was implemented by Kent Beck and Erich Gamma, in 1997, during a plane trip from Switzerland to the United States.
Today, xUnit frameworks exist for most programming languages. Therefore, one of the advantages of unit tests is that developers don’t need to learn a new programming language, as the tests are implemented in the same language as the system under test.
To explain unit testing concepts, let’s use a Stack
class:
import java.util.ArrayList;
import java.util.EmptyStackException;

public class Stack<T> {

  private ArrayList<T> elements = new ArrayList<>();
  private int size = 0;

  public int size() {
    return size;
  }

  public boolean isEmpty() {
    return (size == 0);
  }

  public void push(T elem) {
    elements.add(elem);
    size++;
  }

  public T pop() throws EmptyStackException {
    if (isEmpty())
       throw new EmptyStackException();
    T elem = elements.remove(size - 1);
    size--;
    return elem;
  }
}
JUnit allows the implementation of classes that test application
classes like Stack. By convention, test classes have the
same name as the tested classes, but with a Test suffix.
For example, our first test class is called StackTest. Test
methods, on the other hand, start with the test prefix and
must meet the following requirements: (1) they must be public because
they are called by JUnit; (2) they must not have parameters; and (3)
they must have the @Test annotation, which identifies the
methods that JUnit should execute during testing.
Here is our first unit test:
import org.junit.jupiter.api.Test;
import static org.junit.jupiter.api.Assertions.assertTrue;

public class StackTest {

  @Test
  public void testEmptyStack() {
    Stack<Integer> stack = new Stack<>();
    boolean empty = stack.isEmpty();
    assertTrue(empty);
  }

}
In this initial version, the StackTest class contains a
single test method, which is public, annotated with @Test,
and named testEmptyStack(). This method creates a stack and
tests if it’s empty.
Test methods generally have the following structure:
First, we create the test context, also known as the fixture. This involves instantiating the objects we intend to test and, if necessary, initializing them. In our example, this part of the test simply creates a
Stack.Next, we invoke one of the methods of the class under test. In our example, we invoke the
isEmpty()method.Lastly, we verify if the method’s result matches the expected outcome. For this, we use an assert command. JUnit provides various forms of assertions, all of which share the same goal: to verify whether a particular result matches an expected value. In the example, we use
assertTrue, which verifies if the value passed as a parameter is true.
IDEs provide options to execute only the tests of a system, for
example, through a menu option called Run as Test.
This means if
a developer selects Run,
the program will execute normally,
starting with the main method. However, if they choose the
Run as Test
option, the IDE will execute only the tests, rather
than the entire program.
The following message shows the result of executing our first test. As we can see, the test succeeded. Additionally, we can note that the test ran quickly, completing in just 0.013 seconds.
Tests run: 1, Failures: 0, Errors: 0, Skipped: 0,
Time elapsed: 0.013 s - in StackTest
However, suppose we introduced an error when implementing the
Stack class. For example, if the size
attribute is initialized with 1 instead of 0, the test will fail, as
indicated in the following output.
Tests run: 1, Failures: 1, Errors: 0, Skipped: 0,
Time elapsed: 0.02 s
<<< FAILURE! - in testEmptyStack  <<< FAILURE!
The output indicates that a failure occurred during the execution of
testEmptyStack. In JUnit terminology, a failure refers to a
test where an assert statement fails. The error message
reveals that the assertion responsible for the failure was expecting the
value true (empty stack), but due to the incorrect
initialization of the size attribute, the method under test
(isEmpty) returned false.
AssertionFailedError: expected: <true> but was: <false>
   at testEmptyStack(StackTest.java:21)
To conclude, let’s present the complete unit test code:
import org.junit.jupiter.api.Test;
import org.junit.jupiter.api.BeforeEach;

import static org.junit.jupiter.api.Assertions.assertEquals;
import static org.junit.jupiter.api.Assertions.assertTrue;
import static org.junit.jupiter.api.Assertions.assertFalse;
import static org.junit.jupiter.api.Assertions.assertThrows;

public class StackTest {
  private Stack<Integer> stack;

  @BeforeEach
  public void init() {
    stack = new Stack<>();
  }

  @Test
  public void testEmptyStack() {
    assertTrue(stack.isEmpty());
  }

  @Test
  public void testNotEmptyStack() {
    stack.push(10);
    assertFalse(stack.isEmpty());
  }

  @Test
  public void testSizeStack() {
    stack.push(10);
    stack.push(20);
    stack.push(30);
    assertEquals(3, stack.size());
  }

  @Test
  public void testPushPopStack() {
    stack.push(10);
    stack.push(20);
    stack.push(30);
    assertEquals(30, stack.pop());
    assertEquals(20, stack.pop());
  }

  @Test
  public void testEmptyStackException() {
    assertThrows(java.util.EmptyStackException.class, () -> {
      stack.push(10);
      int result = stack.pop();
      result = stack.pop();
    });
  }
}
The StackTest class has five test methods, all annotated
with @Test. There is also a method called
init(), with a @BeforeEach annotation. This
method is executed by JUnit before any test method. JUnit works as
follows: for each test class, it calls each of its @Test
methods. Each one executes on a separate instance of the test class.
That is, before calling a @Test method, JUnit instantiates
a fresh object of the test class. If the class has a
@BeforeEach method, it is executed before each
@Test method. In our example, we use a
@BeforeEach method to create the Stack used by
the @Test methods. This approach avoids repeating the stack
creation code in each test.
To make it clearer, we present the algorithm used by JUnit to execute unit tests:
for each test class TC:
  for each method m in TC with @Test annotation:
    o = new TC();
    if TC has a method b with @BeforeEach annotation:
       then o.b();
    o.m();
Returning to the StackTest class, another interesting
method is the test case where a call to pop() throws an
EmptyStackException. This test uses an
assertThrows that receives two arguments: an expected
exception and a lambda function. This assertion executes the lambda
function and checks if it throws the exception specified in the first
argument. In our example, the test will pass if the lambda function
throws a java.util.EmptyStackException. Otherwise, it will
fail.
Note: In this chapter, we are using JUnit version 5.10.
8.2.1 Definitions 🔗
Before moving forward, let’s review some key definitions:
Test Method: A method that implements a test and is annotated with the
@TestannotationFixture: The program state verified by one or more test methods, including data, objects, etc. The term is borrowed from the manufacturing industry, where a fixture is a piece of equipment that
fixes
a workpiece to be built (see a photo on Wikipedia). In the context of unit testing, the function of a fixture is tofix
the state, i.e., set up the data and objects to be verified by the test.Test Case: In JUnit, the term refers to a class containing test methods. The name originates from the first versions of JUnit, where the test methods were implemented in classes that inherited from the
TestCaseclass.Test Suite: A set of test cases typically executed together by the unit testing framework, in our case, JUnit.
System Under Test (SUT): The system being tested. It’s a generic term, also used in other types of tests and not limited to unit tests. The term
production code
is also sometimes used to refer to the SUT.
8.2.2 When to Write Unit Tests? 🔗
There are two main answers to this question. First, you can write the tests after implementing a small piece of code. For example, you can implement some methods and then write their tests, which should pass. In other words, you write a bit of code and test it, then write more code and test it again, repeating the cycle.
Alternatively, you can write the tests first, before any production code. Initially, these tests will fail. Thus, you start with code that only compiles and whose tests fail. Then you implement the production code and test again. At this point, the tests should pass. This development style is called Test-Driven Development, and it is discussed in Section 8.7.
A particularly effective time to write a test is when you need to fix a bug reported by a user. In this case, you can start your analysis by writing a test that reproduces the bug and, therefore, fails. Next, you should focus on fixing the bug. If the correction is successful, the test will pass, and you will have added a valuable test to your test suite.
Furthermore, when debugging code, instead of writing a
System.out.println to manually test the result of a method,
you can write a test method instead. While a println
statement should be removed when the bug is fixed, the test becomes a
permanent and valuable addition to your suite of tests.
It’s not recommended to leave the implementation of the tests until the end of the project or sprint, after implementing all the features—as happens, for example, in Waterfall development. In such cases, the tests might be implemented hastily and with low quality. Or they might not be implemented at all, as the system is already working and new features may be allocated to the development team. Furthermore, it’s not advisable for another team or even a third-party company to implement the tests. Instead, we recommend that the developer who implements a class also implements its tests.
8.2.3 Benefits 🔗
The main benefit of unit testing is detecting bugs before the code goes into production. When the system is under development, the costs of fixing bugs are lower. Consequently, in systems with comprehensive tests, it’s less likely that customers will be surprised by bugs.
However, there are two other important advantages. First, unit tests act as a safety net against regressions. A regression occurs when a modification in one part of the code—whether to fix a bug, implement a new feature, or perform a refactoring—inadvertently introduces a bug in another part. In other words, the code regresses because something that was working starts to fail after the change. That said, regressions are less common when good tests are in place. To prevent regressions, after completing a change, the developer should run the test suite. If the change introduces a regression, there’s a good chance it will be detected by the tests. In other words, before the change, the tests were passing, but after the change, they may fail.
Second, unit tests contribute to the documentation of the production
code. For example, by examining the StackTest code, we can
understand various aspects of the Stack class. Therefore,
before maintaining a piece of code, a developer should begin by
reviewing its associated tests.
Real World: Among the programming practices proposed by agile methods, unit testing is probably the one that has had the greatest impact and is most widely adopted. Today, a variety of software systems in companies of all sizes, are developed with the support of unit tests. Below, we highlight examples from two major software companies: Google and Facebook (now known as Meta). These comments were extracted from articles documenting the development process and practices of these companies:
Unit testing is strongly encouraged and widely practiced at Google. All code used in production is expected to have unit tests, and the code review tool will highlight if source files are added without corresponding tests.
(link)At Facebook, engineers conduct any unit tests for their newly developed code. In addition, the code must pass all the accumulated regression tests, which are administered automatically as part of the commit and push process.
(link)
8.3 Principles and Smells 🔗
In this section, we describe best practices and principles for implementing unit tests. The goal is to discuss how to implement tests that can be easily maintained and understood. Additionally, we highlight common pitfalls that should be avoided in the implementation of unit tests.
8.3.1 FIRST Principles 🔗
Unit tests should have the following characteristics (which give rise to the acronym FIRST):
Fast: Developers must run unit tests frequently to receive feedback about bugs and regressions. Therefore, it’s important that these tests execute quickly, ideally in milliseconds. If this is not possible, the test suite should be split into two groups: tests that run quickly and are therefore executed frequently; and slower tests, which are executed less often, for example, once a day.
Independent: The order of execution of unit tests should not matter. For any two tests T1 and T2, running T1 followed by T2 must produce the same result as running T2 and then T1. Indeed, T1 and T2 could also be executed in parallel. For the tests to be independent, T1 should not change any part of the global state that is later used by T2, and vice versa.
Repeatable: Unit tests should always provide the same result. This means that if a test T is called n times, the result should be the same in all n executions. Therefore, T should either pass in every execution or fail in every execution. Tests with non-deterministic results are also called Flaky Tests or Erratic Tests. Concurrency is one of the main causes of flaky tests. An example is shown in the following test:
@Test
public void exampleFlakyTest() {
  TaskResult result;
  MyMath m = new MyMath();
  m.asyncPI(10,result);
  Thread.sleep(1000);
  assertEquals(3.1415926535, result.get());
}
This test calls a function that calculates the value of PI, with an
accuracy of 10 decimal places. However, this function is asynchronous,
meaning it runs in a new thread. Thus, the test uses a
sleep statement to wait for the asynchronous function to
complete. However, this approach makes the test non-deterministic: if
the function finishes before 1000 milliseconds, the test will pass; but
if the execution takes longer, it will fail. To address this issue, a
possible solution is to only test the synchronous implementation of the
function. If this implementation does not exist, refactoring can be
performed to extract it from the asynchronous code. In Section 8.5.2, we
provide an example of such refactoring.
We might think that flaky tests are rare, but a study conducted by Google, covering their own tests, revealed that about 16% of them produce non-deterministic results (link). Consequently, these tests may fail not because of a bug in the code, but due to non-deterministic events, such as a thread taking longer to execute. Flaky tests are problematic because they delay development: developers spend time investigating the failure, only to find that it’s a false alarm.
Self-checking: The result of unit tests should be
easily verifiable. Developers should not have to open and analyze an
output file or manually provide input data to interpret the test
results. Instead, the results should be displayed in the IDE, typically
via components that turn green (to indicate all tests have passed) or
red (to signal a failure). Furthermore, when a test fails, it should be
possible to quickly identify the location of the failed
assert statement.
Timely: Tests should be written as early as possible, ideally even before the code that needs to be tested. This technique was briefly mentioned at the end of Section 8.2 and will be discussed in more detail in the section on Test-Driven Development (Section 8.7).
8.3.2 Test Smells 🔗
Test Smells represent sub-optimal implementation decisions in test code, which, generally, should be avoided. The name is an adaptation, in the context of testing, of the concept of Code Smells or Bad Smells, which we will study in Chapter 9. However, in this chapter, we will discuss smells specific to test code.
An Obscure Test is a long, complex, and difficult-to-understand test. As we’ve mentioned, tests are also used to document the system under test. Therefore, it’s important that they follow clear and easily readable logic. Ideally, a test should check a single requirement of the system under test.
Tests with Conditional Logic include code that may
not be executed. Specifically, tests with if statements or
loops should be avoided, and unit test code should ideally be
linear.
Conditional logic in tests is considered a smell because
it hinders their understanding and readability.
Code Duplication in tests occurs when there are repeated blocks of code in several test methods.
However, these smells should not be taken too literally, i.e., as anti-patterns that need to be avoided at all costs. Instead, they should be seen as warnings to developers. When identifying a test smell, developers should consider whether it’s possible to produce a simpler, shorter test, with linear code, and without code duplication.
Finally, just like with production code, tests should be frequently refactored to ensure they remain simple, easy to understand, and free of unnecessary smells.
8.3.3 Number of Asserts per Test 🔗
Some authors (link) recommend
having at most one assert per test method. Specifically,
they suggest writing tests as follows:
@Test
public void testEmptyStack() {
  assertTrue(stack.isEmpty());
}

@Test
public void testNotEmptyStack() {
  stack.push(10);
  assertFalse(stack.isEmpty());
}
Thus, they advise against using two or more assert
statements in the same test method, as in the following code:
@Test
public void testEmptyStack() {
  assertTrue(stack.isEmpty());
  stack.push(10);
  assertFalse(stack.isEmpty());
}
The first example, which separates the empty stack test into two distinct tests, tends to be more readable and easier to understand than the second one, which combines both checks in a single test. Furthermore, when a test in the first example fails, it’s easier to identify the specific reason for the failure compared to the second example, which can fail for different reasons.
However, we should not be dogmatic in following this rule (link, Chapter 4).
There are cases where multiple assert statements per test
method are justified. For example, consider a getBook
function that returns an object with the title, author, year, and
publisher of a book. In this case, it’s reasonable to have four
assert statements in the test, each checking one of the
fields of the returned object, as shown in the following code.
@Test
public void testBookService() {
  BookService bs = new BookService();
  Book b = bs.getBook(1234);
  assertEquals("Software Engineering", b.getTitle());
  assertEquals("Marco Tulio Valente", b.getAuthor());
  assertEquals(2024, b.getYear());
  assertEquals("ASERG/DCC/UFMG", b.getPublisher());
}
Another exception occurs when we have a simple method that can be
tested using a single assert for multiple cases. To illustrate, we show
a test for the Strings.repeat function provided by the
google/guava library.
@Test
public void testRepeat() {
  String input = "20";
  assertEquals("", Strings.repeat(input,0));
  assertEquals("20", Strings.repeat(input,1));
  assertEquals("2020", Strings.repeat(input,2));
  assertEquals("202020", Strings.repeat(input,3));
  ...
}
In this test, we have four assertEquals statements that
test the result of repeating a specific string zero, one, two, and three
times, respectively.
8.4 Test Coverage 🔗
Test coverage is a metric that helps determine the number of tests we need to write for a program. It measures the percentage of statements in a program executed by the existing tests and is calculated as:
Test coverage = (Number of statements executed by the tests) / (Total number of statements in the program)
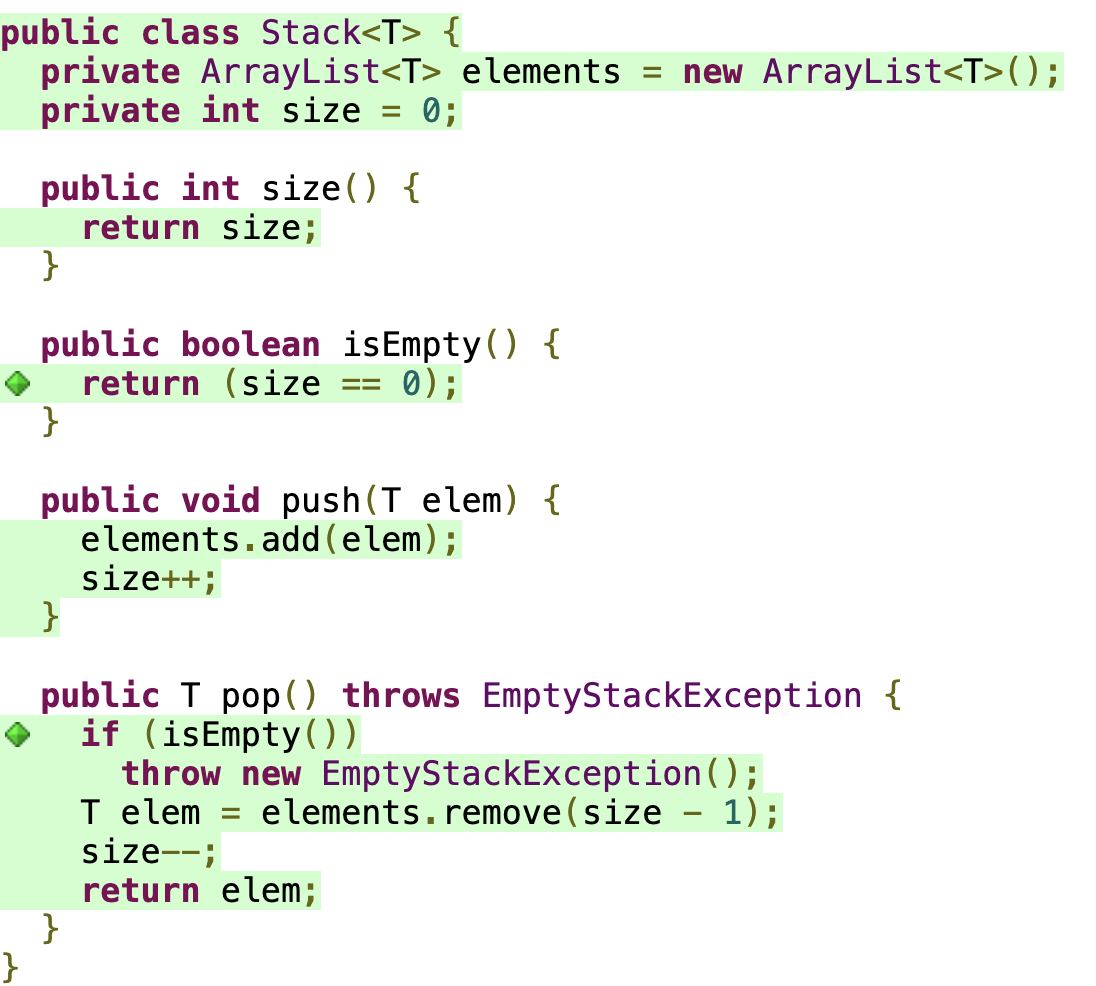
Various tools exist to calculate test coverage. The following figure
shows an example using a coverage library called JaCoCo (Java Code
Coverage). The lines with a green background—as automatically
highlighted by this tool—are the ones covered by the tests in
StackTest. The only lines not highlighted in green are
those responsible for the method signatures, which do not correspond to
executable statements. The test coverage in this example is 100% because
the tests execute all statements in the Stack class.
Now, let’s consider a scenario where we have not implemented
testEmptyStackException. This test verifies the exception
raised by pop() when called on an empty stack. Omitting
this specific test would result in the coverage dropping to 92.9%.
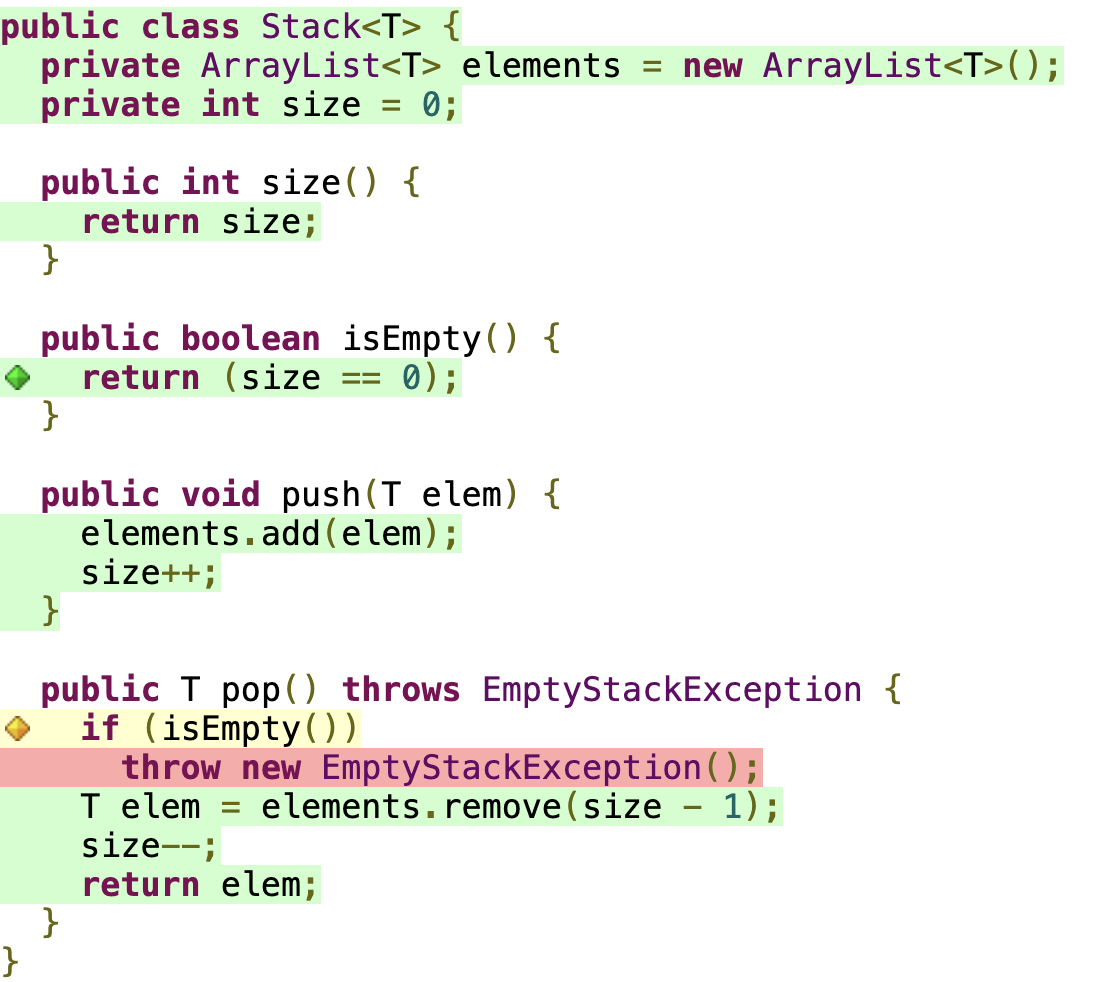
In these figures, the green lines represent code covered by the
execution of the tests. However, there’s also a statement marked in
yellow. This color indicates that the statement is a branch (in this
case, an if) statement and that only one of the possible
paths through the branch (the false path) was exercised by the tests.
Finally, a line marked in red indicates code not covered by the
tests.
In Java, test coverage tools often operate by instrumenting the bytecode generated by the compiler. As shown in the figure with coverage statistics, after compilation, the program has 52 instructions covered by the tests out of a total of 56 instructions. Therefore, the test coverage is 52 / 56 = 92.9%.
8.4.1 What is the Ideal Test Coverage? 🔗
There is no universal or absolute target number for test coverage. The recommended coverage varies from project to project, depending on the complexity of the requirements, the criticality of the system, and other factors. Generally, it does not need to be 100%, as there are always trivial methods in a system, such as getters and setters. Moreover, some methods are more challenging to test, such as user interface methods or those with asynchronous behavior.
Therefore, setting a rigid coverage goal that must always be achieved is not advisable. Instead, we should monitor the evolution of coverage results over time to ensure developers maintain their commitment to writing tests. It is also important to carefully assess the statements or methods not covered by the existing tests and confirm that they are either non-critical or intrinsically more challenging to test.
Given these considerations, teams that prioritize writing tests often achieve coverage of approximately 70% (link). On the other hand, values below 50% tend to raise concerns (link). Furthermore, even when using TDD, test coverage usually does not reach 100% but typically exceeds 90% (link).
Real World: At a Google developers conference in 2014, statistics on coverage measures of the company’s systems were presented (see the video). The median coverage for Google’s systems was 78% in terms of statements. As mentioned in the presentation, the recommended target is 85% for most systems, although this isn’t set in stone. It was also mentioned that coverage varies by programming language. The lowest coverage was found in C++ projects, averaging slightly below 60%. The highest coverage was measured for Python, slightly above 80%.
8.4.2 Other Definitions of Coverage 🔗
The definition of coverage presented earlier, based on statements,
is the most common one. However, other definitions exist, such as
function coverage (percentage of functions executed by
the tests), function call coverage (among all the
statements in a program that call functions, the percentage exercised by
the tests), and branch coverage (percentage of branches
in a program executed by the tests; an if always generates
two branches: one when the condition is true and another when it is
false). Statement and branch coverages are also known as C0
Coverage and C1 Coverage, respectively. To
illustrate the difference between the two, consider the following class
(first snippet) and its unit test (second snippet):
public class Math {

  public int abs(int x) {
    if (x < 0) {
      x = -x;
    }
    return x;
  }
}
public class MathTest {
@Test
public void testAbs() {
Math m = new Math();
assertEquals(1, m.abs(-1));
}
}Using statement coverage, we achieve 100% test coverage. However, for
branch coverage, the value is 50% because we only tested one of the
branches (the true condition) of the if (x < 0) clause.
To achieve 100% branch coverage, we need to add another
assert, such as: assertEquals(1, m.abs(1)).
This example shows that branch coverage is more rigorous than statement
coverage.
8.5 Testability 🔗
Testability describes how easy it is to test a program. As we have seen, it is important that tests follow the FIRST principles, have few assertions, and achieve high coverage. However, the design of the production code should also facilitate the implementation of tests. This design property is called testability. Consequently, a significant part of the effort in writing good tests should be directed towards the design of the system under test, rather than solely focused on the design of the tests.
The good news is that code that follows the design principles we discussed in Chapter 5—such as high cohesion, low coupling, single responsibility, separation between presentation and model, dependency inversion, and the Law of Demeter, among others—tends to exhibit good testability.
8.5.1 Example: Servlet 🔗
A servlet is a Java package for implementing dynamic web pages. As an
example, we will present a servlet that calculates a person’s Body Mass
Index, given their weight and height. Our goal here is entirely
didactic. Therefore, we will not explain the entire protocol for
implementing servlets. Moreover, the logic of this example is
straightforward, consisting of the following formula:
weight / (height * height). However, imagine that it could
be more complex; even in such a case, the solution presented here would
still apply.
public class BMIServlet extends HttpServlet {
  public void doGet(HttpServletRequest req,
                    HttpServletResponse res) {
    res.setContentType("text/html");
    PrintWriter out = res.getWriter();
    String weight = req.getParameter("weight");
    String height = req.getParameter("height");
      try {
        double w = Double.parseDouble(weight);
        double h = Double.parseDouble(height);
        double bmi = w / (h * h);
        out.println("Body Mass Index (BMI): " + bmi);
      } catch (NumberFormatException e) {
        out.println("Data must be numeric");
      }
  }
}
Note that writing a test for BMIServlet is challenging,
as it depends on other types from Java’s Servlet package. For example,
instantiating a BMIServlet object and then calling
doGet is not straightforward. If we were to take this
approach, we would also need to create HttpServletRequest
and HttpServletResponse objects to pass as parameters to
doGet. However, these types may rely on other types,
creating a dependency chain. In summary, the testability of
BMIServlet is low.
One solution to testing this class is to extract the domain logic
into a separate class, as shown in the next code snippet. This approach
enhances the testability of the new domain class, called
BMIModel, as it does not depend on Servlet-related types.
Consequently, creating a BMIModel object becomes
straightforward. However, after this refactoring, we will not be testing
the complete code. Nonetheless, testing the domain logic of the program
is preferable to leaving all of its code uncovered by tests.
class BMIModel {
  public double calculateBMI(String w1, String h1)
                throws NumberFormatException {
    double w = Double.parseDouble(w1);
    double h = Double.parseDouble(h1);
    return w / (h * h);
  }
}

public class BMIServlet extends HttpServlet {
  private BMIModel model = new BMIModel();

  public void doGet(HttpServletRequest req,
                    HttpServletResponse res) {
    res.setContentType("text/html");
    PrintWriter out = res.getWriter();
    String weight = req.getParameter("weight");
    String height = req.getParameter("height");
    try {
      double bmi = model.calculateBMI(weight, height);
      out.println("Body Mass Index (BMI): " + bmi);
    } catch (NumberFormatException e) {
      out.println("Data must be numeric");
    }
  }
}
8.5.2 Example: Asynchronous Call 🔗
The following code presents the implementation of the
asyncPI function discussed in Section 8.3 when introducing
the FIRST principles and, specifically, the concept of repeatable tests.
As previously explained, testing an asynchronous function is difficult,
since its result is computed by another thread. The test in Section 8.3
used a Thread.sleep to wait for the result of
asyncPI. However, this approach makes the test
non-deterministic (or flaky).
public class MyMath {
  public void asyncPI(int prec, TaskResult task) {
    new Thread (() -> {
      double pi = "calculates PI with precision prec"
      task.setResult(pi);
    }).start();
  }
}
We will now present a solution to improve the testability of this
class. First, we extract the code that computes the PI value into a
separate and synchronous function, called syncPI. This
approach allows us to test this function independently using a unit
test. Therefore, our previous observation still holds: extracting a
function that is easy to test is preferable to leaving the entire code
untested.
public class MyMath {
  public double syncPI(int prec) {
    double pi = "calculates PI with precision prec"
    return pi;
  }

  public void asyncPI(int prec, TaskResult task) {
    new Thread (() -> {
      double pi = syncPI(prec);
      task.setResult(pi);
    }).start();
  }

}
8.6 Mocks 🔗
To explain the role of mocks in unit tests, let’s start with a motivating example and discuss the challenges in writing a unit test for it. We will then introduce the concept of mocks as a solution for testing this example.
Note: In this chapter, we use the term mock with the
same meaning as stub. This choice is based on the
common usage of mock
in several testing frameworks. However, we
will include a subsection later to clarify how some authors
differentiate between these terms.
Motivating Example: To illustrate the concept of
mocks, let’s examine a simple class for book searching, as shown below.
This class, called BookSearch, implements a
getBook method that searches for books using a remote
service. This service, in turn, implements the
BookRepository interface. To make the example more
realistic, let’s assume that BookRepository represents a
REST API. The key point, however, is that the search is conducted on
another server, which is abstracted by BookRepository. This
server returns its result as a JSON document, which is essentially a
text document. The getBook method accesses the remote book
repository, retrieves the response in JSON format, and creates a
Book object to store the search result. The
Book class (not shown) contains fields for book data and
their corresponding getter methods.
import org.json.JSONObject;

public interface BookRepository {
  String search(int isbn);
}

public class BookSearch {
  private BookRepository repo;

  public BookSearch(BookRepository repo) {
    this.repo = repo;
  }

  public Book getBook(int isbn) {
    String json = repo.search(isbn);
    JSONObject obj = new JSONObject(json);
    String title = (String) obj.get("title");
    return new Book(title);
  }
}
Problem: We need to implement a unit test for the
getBook method of BookSearch. However, by
definition, a unit test should exercise a small component of the
program, such as a single class. The problem arises because to test
getBook we need to access a BookRepository,
which currently is an external service. That is, if we are not careful,
the test will interact with an external service. This is problematic for
two reasons: (1) the scope of the test will be larger than a small unit
of code; and (2) the test will be slower, because it is accessing a
remote service, which requires using a network protocol. Unit tests,
however, should be fast, as recommended by the FIRST principles we
studied in Section 8.3.
Solution: To address this issue, we can create an
object that emulates the real object, but only for testing purposes.
This kind of object is called a mock (or stub). In our
example, the mock must implement the BookRepository
interface and, therefore, the search method. However, this
implementation is simplified, as the mock simply returns the titles of
predefined books without accessing any remote server. An example is
shown below:
class BookConst {
  public static String SOFTENG =
          "{ \"title\": \"Software Engineering\" }";
  public static String NULLBOOK =
          "{ \"title\": \"NULL\" }";
}

class MockBookRepository implements BookRepository {
   public String search(int isbn) {
      if (isbn == 1234)
         return BookConst.SOFTENG;
      return BookConst.NULLBOOK;
   }
}

public class BookSearchTest {

  private BookSearch bs;

  @BeforeEach
  public void init() {
    bs = new BookSearch(new MockBookRepository());
  }

  @Test
  public void testGetBook() {
    String title = bs.getBook(1234).getTitle();
    assertEquals("Software Engineering", title);
  }
}
In this example, MockBookRepository is a class used to
create mocks of BookRepository, i.e., objects that
implement this interface with a simplified behavior. Specifically, the
mock objects only return data about the book with ISBN 1234. The purpose
of this mock is to allow a test that does not access a remote and slow
service. The testGetBook uses a BookSearch
object that was created with a MockBookRepository().
However, one question remains: what does testGetBook
actually test? More precisely, what requirements are being verified with
such a simple mock object? In this case, we are not testing access to
the remote service, as mentioned earlier. That requirement is beyond the
scope of unit tests. Instead, we are testing whether the logic of
creating a Book object from a JSON document is working as
expected. For a more comprehensive test, we could include additional
fields in Book other than the title. Additionally, we could
test with more books by extending the mock.
8.6.1 Mock Frameworks 🔗
Due to the prevalence of mocks (or stubs) in unit testing, there are frameworks that facilitate their creation. While we won’t explore these frameworks in depth, we will present the code for the previous test using a mock created with a popular framework called Mockito (link).
import static org.mockito.Mockito.mock;
import static org.mockito.Mockito.when;
import static org.mockito.ArgumentMatchers.anyInt;
import static org.junit.jupiter.api.Assertions.assertEquals;

public class BookSearchTest {

  private BookSearch bs;

  @BeforeEach
  public void init() {
    BookRepository mockRepo = mock(BookRepository.class);
    when(mockRepo.search(anyInt()))
        .thenReturn(BookConst.NULLBOOK);
    when(mockRepo.search(1234))
        .thenReturn(BookConst.SOFTENG);
    bs = new BookSearch(mockRepo);
  }

  @Test
  public void testGetBook() {
    String title = bs.getBook(1234).getTitle();
    assertEquals("Software Engineering", title);
  }
}
The key observation is that we no longer need a
MockBookRepository class. The main benefit of using a mock
framework is precisely this: eliminating the need to implement mocks
manually. Instead, the mock for BookRepository is created
by the framework itself using Java’s reflection features. We simply need
to call the mock(type) function, as follows:
mockRepo = mock(BookRepository.class);
However, the mock is initially created without any behavior. We must then configure it to behave in particular situations. Specifically, we need to define its responses to certain book searches. For this, Mockito offers a simple domain-specific language, based on Java syntax. Here are the examples:
when(mockRepo.search(anyInt())).thenReturn(BookConst.NULLBOOK);
when(mockRepo.search(1234)).thenReturn(BookConst.SOFTENG);
These two lines configure our mock object. The first line instructs
it to return BookConst.NULLBOOK when the
search method is called with any integer as an argument.
The second line specifies an exception to this general rule: when
search is called with the argument 1234, it returns the
JSON string that describes the SOFTENG book.
8.6.2 Mocks vs Stubs 🔗
Some authors, such as Gerard Meszaros (link), make a distinction between mocks and stubs. These authors argue that mocks should emulate not only the state of the System Under Test (SUT) but also its behavior. They argue that when mocks only verify the state (as in our example), they should instead be called stubs. However, in this book, we will not make this distinction. We consider it overly nuanced, and therefore, the benefits do not outweigh the costs of additional paragraphs to explain closely related concepts.
However, just to clarify further, a behavioral test—also called an interaction test—checks for events (e.g., method calls) that occur during test execution. Here is an example:
void testBehaviour {
  Mailer m = mock(Mailer.class);
  sut.someBusinessLogic(m);
  verify(m).send(anyString());
}
In this example, the verify command, provided by
Mockito, functions similarly to an assert. However, it
checks if an event occurred with the mock passed as an argument. In this
case, we verify whether the mock’s send method was executed
at least once, using any string argument.
According to Meszaros, mocks and stubs are specific cases of test doubles. In addition to mocks and stubs, there are two other types of doubles:
Dummy Objects are passed as arguments to a method but are not used in the method’s body. Their primary purpose is to bypass the language’s type system.
Fake Objects have a simpler implementation than a real object. For example, they can simulate a database in memory.
8.6.3 Example: Servlet 🔗
In the previous section, we discussed the testing of a servlet that calculates the Body Mass Index (BMI) of a person. We explained that testing this servlet is challenging due to its complex dependencies, which are difficult to recreate in a test. However, we can now leverage mocks for these dependencies, which are objects that emulate the real dependencies but only respond to the calls needed in our test.
First, let’s reintroduce the servlet we want to test:
public class BMIServlet extends HttpServlet {
  private BMIModel model = new BMIModel();

  public void doGet(HttpServletRequest req,
                    HttpServletResponse res) {
    res.setContentType("text/html");
    PrintWriter out = res.getWriter();
    String weight = req.getParameter("weight");
    String height = req.getParameter("height");
    double bmi = model.calculateBMI(weight, height);
    out.println("BMI: " + bmi);
  }
}
And here is the new test for this servlet (it is an adaptation of an
example used in an article
by Dave Thomas and Andy Hunt). In the init method, we
create mocks for the HttpServletRequest and
HttpServletResponse objects. These mocks are used as
parameters for the doGet call made in the test method.
Additionally, in init, we create a
StringWriter object to capture the output as a string. This
object is then encapsulated by a PrintWriter, which is the
output object used by the servlet—thus, this is an example of the
Decorator design pattern studied in Chapter 6. Finally, we program the
response of the mock: when the servlet asks for an output object, by
calling getWriter(), it should return the
PrintWriter object we just created. In essence, we
performed all these steps to redirect the servlet output to a
string.
public class BMIServletTest {
  private HttpServletRequest req;
  private HttpServletResponse res;
  private StringWriter sw;

  @BeforeEach
  public void init() {
    req = mock(HttpServletRequest.class);
    res = mock(HttpServletResponse.class);
    sw = new StringWriter();
    PrintWriter pw = new PrintWriter(sw);
    when(res.getWriter()).thenReturn(pw);
  }

  @Test
  public void testDoGet() {
    when(req.getParameter("weight")).thenReturn("82");
    when(req.getParameter("height")).thenReturn("1.80");
    new BMIServlet().doGet(req, res);
    assertEquals("BMI: 25.3\n", sw.toString());
  }
}
In the testDoGet method, we begin by configuring the
mock with the input parameters for the servlet. When the servlet
requests the weight
parameter, the mock returns 82
; when
it requests the height
parameter, it returns 1.80
. After
that, the test follows the typical flow of unit tests: we call the
method we want to test, doGet, and verify whether it
returns the expected result.
This example also illustrates the disadvantages of using mocks. The
primary drawback is that mocks can increase coupling between the test
and the System Under Test (SUT). Typically, in unit tests, the test
calls the tested method and verifies its result. Thus, the test doesn’t
break when the internal code of the tested method is modified. However,
when using mocks, this is no longer always true, as the mock may depend
on internal structures or events of the tested method, making the tests
more fragile. For instance, if the servlet’s output changes to Body
Mass Index(BMI):[value]
, we would need to update the
assertEquals in the unit test.
Finally, it’s important to note that not all objects and methods can be mocked. Specifically, final classes and methods, static methods, and constructors are difficult or impossible to mock.
8.7 Test-Driven Development 🔗
Test-Driven Development (TDD) is one of the programming practices proposed by Extreme Programming (XP). Initially, the idea seems counterintuitive: given a unit test T for a class C, TDD advocates implementing T before implementing C. For this reason, this technique is also known as Test-First Development.
When we write the test first, it will fail. However, in the TDD workflow, the next step is to write the code that makes this test pass, even if it’s initially just trivial. Next, this code should be refined. Finally, if necessary, it should be refactored to improve its design, readability, and maintainability, as well as to adhere to design principles and patterns.
TDD was proposed with three objectives in mind:
TDD prevents developers from forgetting to write tests. This is because TDD promotes testing as the first activity of any programming task, whether fixing a bug or implementing a new feature. Thus, it becomes more difficult to postpone the writing of tests to a later stage. As we mentioned in Section 8.4, when using TDD, test coverage is usually greater than 90%.
TDD encourages writing code with high testability. This benefit is a natural consequence of the inverted workflow proposed by TDD: since developers first write the test T and then the class C, they are naturally inclined to design C to facilitate testing.
TDD is not only a testing practice but also a design practice. This occurs because developers, by starting with the tests T, put themselves in the position of a user of the class C. In other words, with TDD, the first user of the class is its own developer—recall that T is a client of C, as it calls methods from C. Therefore, it is expected that developers will define a simple interface for the class, using readable method names and minimizing the number of parameters, among other best practices.
When working with TDD, developers follow a cycle composed of three states, as illustrated in the following figure.

According to this figure, the first goal is to reach the red state in which the test is not yet passing. Although it may seem strange, the red state is already a small victory: by writing a test that fails, developers establish a specification for the class they need to implement next. As previously mentioned, in this state, it is also important for developers to think about the interface of the class under test, putting themselves in the position of a user of this class. Finally, it is important that the class compiles. To achieve this, developers must at least define the name of the class and the signatures of its methods.
The subsequent goal is to reach the green state. To achieve this,
developers must implement the full functionality of the class under
test, causing the tests to pass. However, this implementation can be
performed in baby steps.
Initially, the code may only work
partially, for example, by returning constants only. This process will
become clearer in the upcoming example.
Finally, developers should seek opportunities to refactor both the class and the test. When using TDD, the goal is not just to reach the green state, where the program is working. Instead, developers should also assess the quality of the code. They should, for example, check for duplicate code, identify overly large methods that can be broken into smaller ones, and evaluate whether methods should be moved to a different class. After refactoring, developers can either conclude the process or restart the cycle to implement another feature.
8.7.1 Example: Shopping Cart 🔗
To conclude, let’s simulate a programming session using TDD. For
this, we will use a virtual bookstore system as an example. In this
system, we have a Book class, with the attributes
title, isbn, and price. We also
have a ShoppingCart class, which stores the books the
customer has decided to buy. This class must have methods to add a book
to the cart, calculate the total price of the books in the cart, and
remove a book from the cart. Next, we will describe the implementation
of these methods using TDD.
Red State: We start by defining that
ShoppingCart has an add and a
getTotal method. In addition to defining the names of these
methods, we specify their parameters and write the first test:
@Test
void testAddGetTotal() {
  Book b1 = new Book("book1", 10, "1");
  Book b2 = new Book("book2", 20, "2");
  ShoppingCart cart = new ShoppingCart();
  cart.add(b1);
  cart.add(b2);
  assertEquals(30.0, cart.getTotal(), 0.01);
}
Although simple, this test does not compile, as there is no
implementation for the Book and ShoppingCart
classes. Therefore, we must provide these implementations, as shown
below:
public class Book {
  public String title;
  public double price;
  public String isbn;

  public Book(String title, double price, String isbn) {
    this.title = title;
    this.price = price;
    this.isbn = isbn;
  }
}

public class ShoppingCart {

  public ShoppingCart() {}

  public void add(Book b) {}

  double getTotal() {
    return 0.0;
  }
}
The implementation of both classes is very simple. We have
implemented just the bare minimum necessary for the program to compile.
For instance, getTotal merely returns 0.0. Nevertheless, we
have achieved our goal in the red state: we now have a test that
compiles, runs, and fails!
Green State: The previous test serves as a
specification for what we need to implement in
ShoppingCart. Let’s implement it as follows:
public class ShoppingCart {
  public ShoppingCart() {}
  public void add(Book b) {}
  public double getTotal() {
    return 30.0;
  }
}
However, readers might be surprised again: this implementation is
still incorrect! The ShoppingCart constructor is empty, the
class does not have any attributes, and getTotal always
returns 30.0. While all of this is true, we have achieved another small
victory: the test has changed from red to green. It is now passing! With
TDD, the improvements are always incremental. In XP’s vocabulary, these
are called baby steps.
Now, we should provide a more realistic implementation of
ShoppingCart:
public class ShoppingCart {
  private List<Book> items;
  private double total;

  public ShoppingCart() {
    items = new ArrayList<>();
    total = 0.0;
  }

  public void add(Book b) {
    items.add(b);
    total += b.price;
  }

  public double getTotal() {
    return total;
  }
}
In this new version, we have a list to store the cart items, an
attribute to store the total value of the books, a constructor, and an
add method that adds the books to the list and increases
the cart’s total. Based on our current understanding, this
implementation meets the class specification, and thus we have reached
the green state.
Yellow State: Finally, we should review the code
that was implemented and apply the properties, principles, and design
patterns we learned in the previous chapters. In other words, we should
consider if there is anything we can do to make this code more readable,
easier to understand, and easier to maintain. In our example, one idea
that may arise is to encapsulate the Book fields, which are
currently public. So, we should implement getter methods to access them.
Since this implementation is straightforward, we won’t show the
refactored code here.
At this point, we have completed an iteration of the red-green-refactor TDD cycle. We can now either stop or consider implementing another requirement. For example, we could implement a method to remove books from the cart. To do this, we should start another cycle.
8.8 Integration Tests 🔗
In integration tests—also known as service tests—we move to an intermediate level of the testing pyramid (see the figure of this pyramid in the first section of the chapter). These tests aim to exercise a complete service, or a complete feature of the system, rather than testing a small unit of code, such as a single class. Therefore, integration tests involve more classes, sometimes from distinct packages. They also test dependencies and real systems, such as databases and remote services. Unlike unit tests, integration tests don’t use mocks. Being more complex, they take more time to run and, consequently, are executed less frequently.
8.8.1 Example: Q&A Forum App 🔗
Consider a Q&A forum application, similar to Stack Overflow, which was previously explored in Chapter 2. This application implements a class with methods to handle the basic operations that users can perform in the forum:
public class Forum {

  // Constructor: receives a database connection
  public Forum(Connection connection) { ... }

  // Method to add a new question to the forum
  public void addQuestion(String text) { ... }

  // Method to list all questions in the forum
  public List<Question> listAllQuestions() { ... }
}
Next, we show an integration test for this system:
public class ForumIntegrationTest {
  private Forum forum;
  private Connection connection;

  @BeforeEach
  public void setup() throws SQLException {
    connection = DB.truncateDatabaseTables();
    forum = new Forum(connection);
  }

  @AfterEach
  public void cleanup() throws SQLException {
    if (connection != null) && !connection.isClosed()) {
       connection.close();
    }
  }

  @Test
  public void testEmptyDatabase() {
    List<Question> questions = forum.listAllQuestions();
    assertEquals(0, questions.size());
  }

  @Test
  public void testAddingThreeQuestions() {
    forum.addQuestion("1 + 1 = ?");
    forum.addQuestion("2 + 2 = ?");
    forum.addQuestion("3 + 3 = ?");

    List<Question> questions = forum.listAllQuestions();

    assertEquals(3, questions.size());
    assertEquals("1 + 1 = ?", questions.get(0).getText());
    assertEquals("2 + 2 = ?", questions.get(1).getText());
    assertEquals(0, questions.get(2).getNumAnswers());
  }

}
Let’s examine two key aspects of this test. First, it is implemented using JUnit, similar to the unit tests discussed earlier in this chapter. This demonstrates that JUnit can be used for both unit tests and integration tests. Second, as an integration test, the class is tested with actual dependencies, such as a database. The database is truncated before each test to ensure a clean state. The first test verifies that an empty database contains no questions, while the second test adds three questions and retrieves them, validating the results using four assertions on the list of questions. In summary, this test exercises the main methods of our forum system, excluding those related to its user interface.
8.9 End-to-End Tests 🔗
End-to-end tests—also known as system tests or interface tests—are positioned at the top of the testing pyramid. These tests simulate real user interactions with a system. They are the most resource-intensive automated tests, requiring more effort to implement and taking the longest to execute.
8.9.1 Example: Web System Test 🔗
Selenium is a framework for automating web system tests. This
framework enables the creation of tests that behave like robots by
opening web pages, filling out forms, clicking buttons, and checking
responses. The following example—adapted from the Selenium documentation
(link)—demonstrates
this functionality. The code simulates a Firefox user making a Google
search for the word software
. Upon completion, the test prints
out the title of the page with the search results.
public class SeleniumExample {

  public static void main(String[] args) {
    // create a driver to access a web server
    WebDriver driver = new FirefoxDriver();

    // instruct the driver to "navigate" to Google
    driver.navigate().to("http://www.google.com");

    // get the search input field, with name "q"
    WebElement element = driver.findElement(By.name("q"));

    // fill this field with the word "software"
    element.sendKeys("software");

    // submit the search query
    element.submit();

    // wait for the response page to load (8s timeout)
    new WebDriverWait(driver, 8).until(new ExpectedCondition<Boolean>() {
        public Boolean apply(WebDriver d) {
          return d.getTitle().toLowerCase().startsWith("software");
        }
    });

    // expected result: "software - Google Search"
    System.out.println("Page title is: " + driver.getTitle());

    // close the browser
    driver.quit();
  }
}
End-to-end tests are more challenging to write than unit tests and even integration tests. For instance, the Selenium API is more complex than that of JUnit. Moreover, the test must handle interface events, such as timeouts that occur when a page takes longer than usual to load. End-to-end tests are also more prone to breaking due to minor changes in the user interface. For example, if the name of the search field on Google’s main page changes, the previous test would need to be updated. However, compared to the alternative—conducting the test manually—end-to-end tests remain valuable and offer significant benefits.
8.9.2 Example: Compiler Test 🔗
When implementing a compiler, we can use both unit and integration tests. However, in this case, end-to-end tests tend to be conceptually simpler. This is because a compiler interface doesn’t have windows and pages with graphical elements. Instead, a compiler receives an input file and produces an output file. Therefore, to implement end-to-end tests for a compiler C of language X, we should create a set of programs in X that exercise various aspects of the language. For each program P, we should define a set of input values and output data. Ideally, the output should be in a simple format, such as a list of strings. In this context, the end-to-end tests proceed as follows: first, call C to compile each program P; then, run P with the defined input and verify if the result matches the expected output. This process constitutes an end-to-end test, as it exercises all modules of the compiler.
Compared to unit tests, identifying the code responsible for a failure in end-to-end tests is more challenging. For example, in the case of compiler tests, we may receive an indication that a program is not executing correctly. However, it can be difficult to trace this failure to the specific function that caused the buggy code.
8.10 Other Types of Testing 🔗
8.10.1 Black-Box and White-Box Testing 🔗
Testing techniques can be classified as black-box or white-box. When using a black-box technique, tests are written based solely on the interface of the code under test. For example, if the goal is to test a method as a black-box, the only available information is its name, parameters, return type, and exceptions. On the other hand, when using a white-box technique, test implementation takes into account information about the code’s internals and structure. Black-box testing techniques are also referred to as functional tests, while white-box techniques are called structural tests.
However, classifying unit tests into either category is not always straightforward. The classification depends on how the tests are written. If unit tests are written using information only about the interface of the methods under test, they are considered black-box. However, if their implementation considers information about test coverage, such as whether specific branches are executed, then they are white-box tests. In summary, unit tests exercise a small and isolated unit of code. This unit can be tested as a black-box (considering only its interface and specification) or as a white-box (leveraging its internal structure to implement more effective tests).
A similar observation can be made about the relationship between TDD and black-box/white-box testing. To clarify this relationship, let’s consider the following comment from Kent Beck (source: Test-Driven Development Violates the Dichotomies of Testing, Three Rivers Institute, 2007):
Another misleading dichotomy is between black-box and white-box tests. Since TDD tests are written before the code they are to test, they are black-box tests. However, I commonly get the inspiration for the next test from looking at the code, a hallmark of white-box testing.
8.10.2 Test Data Selection 🔗
When adopting black-box testing, several techniques can assist in the selection of test inputs. One such technique is Equivalence Classes, which recommends dividing the inputs of a program into sets of values that have the same likelihood of containing a bug. These sets are called equivalence classes. For each equivalence class, we should test only one of its values, which can be selected randomly.
Consider a function to calculate the income tax amount to be paid, for each salary range, as illustrated in the following table. Partitioning based on equivalence classes suggests testing this function with four salaries, one from each salary range.
| Salary Range (in $) | Tax Rate |
|---|---|
| 1,903.99 to 2,826.65 | 7.5% |
| 2,826.66 to 3,751.05 | 15% |
| 3,751.06 to 4,664.68 | 22.5% |
| Above 4,664.68 | 27.5% |
Boundary Value Analysis is a complementary technique that recommends testing with the boundary values of each equivalence class and with the values that immediately precede or succeed such boundaries. This approach is based on the observation that bugs are often caused by incorrect handling of boundary conditions. For example, in our income tax calculation function, we should test the first salary range with the following values:
- 1,903.98: the value immediately preceding the lower limit
- 1,903.99: the lower limit
- 2,826.65: the upper limit
- 2,826.66: the value immediately succeeding the upper limit
It’s worth noting that defining equivalence classes for a function’s input domain is not always straightforward. In fact, not all functions have input domains organized into well-defined ranges like those in our example.
To conclude, it’s important to note that exhaustive testing—testing a program with all possible inputs—is, in practice, infeasible, even for small programs. For example, a function with only two integer parameters could take years to test all possible pairs of integers. Random testing, where the test data is chosen randomly, is also often inadequate. This is because random selection may choose values from the same equivalence class, leading to redundancy, while other classes might remain untested.
8.10.3 Acceptance Tests 🔗
These are tests carried out by the customers, using their own data. The results determine whether the customers will accept the implemented software. If they do, the system can be put into production. If they do not, necessary adjustments must be made. In agile methodologies, for example, a user story is only considered complete after it passes the acceptance tests defined and conducted by the Product Owner.
Acceptance tests have two characteristics that distinguish them from the tests discussed earlier in this chapter. First, they are typically manual tests, carried out by the customers or their representatives. Second, they are not exclusively a verification activity (as with the previous tests), but also a validation activity. As we learned in Chapter 1, verification checks if we’ve implemented the software correctly, that is, in line with its specification. In contrast, validation checks if we’ve implemented the right software, that is, the one that meets the actual needs of the customers.
Acceptance tests are commonly divided into two main types. Alpha tests are conducted with customers in a controlled environment, such as the developer’s workstation. If the system passes these tests, a test with a larger customer group can be conducted, no longer in a controlled environment. These latter tests are referred to as beta tests.
8.10.4 Non-Functional Requirements Testing 🔗
The previous testing strategies focused primarily on functional requirements; therefore, their primary goal was to find bugs. However, it is also important to perform tests to verify non-functional requirements. For example, there are tools that support the execution of performance tests to assess the system’s behavior under specific load conditions. An e-commerce company might use these tools to simulate the performance of their website during major events, such as Black Friday or other peak shopping periods. Usability tests are used to evaluate the system’s user interface and often involve the observation of real users interacting with the system. Failure tests simulate abnormal events in a system, such as the failure of specific services or of an entire data center.
Bibliography 🔗
Gerard Meszaros. xUnit Test Patterns: Refactoring Test Code. Addison-Wesley, 2007.
Kent Beck, Erich Gamma. Test-infected: Programmers Love Writing Tests. Java Report, vol. 3, issue 7, p. 37-50, 1998.
Kent Beck. Test-Driven Development: By Example, Addison-Wesley, 2002.
Dave Thomas, Andy Hunt. Mock Objects. IEEE Software, vol. 19, issue 3, p. 22-24, 2002.
Maurício Aniche. Testes automatizados de software: um guia prático. Casa do Código, 2015. (in Portuguese)
Jeff Langr, Andy Hunt, Dave Thomas. Pragmatic Unit Testing in Java 8 With JUnit. O’Reilly, 2015.
Exercises 🔗
1. Describe three key benefits of unit testing.
2. Consider a function fib(n) that returns the n-th term
of the Fibonacci sequence, i.e., fib(0) = 0,
fib(1) = 1, fib(2) = 1,
fib(3) = 2, fib(4) = 3, etc. Write a unit test
for this function.
3. Rewrite the following test, which checks for an
EmptyStackException, to make it simpler and more
readable.
@Test
public void testEmptyStackException() {
  boolean success = false;
  try {
    Stack<Integer> stack = new Stack<>();
    stack.push(10);
    int r = stack.pop();
    r = stack.pop();
  } catch (EmptyStackException e) {
    success = true;
  }
  assertTrue(success);
}
4. The following code contains manual tests for the Java
ArrayList class using System.out.println
statements. Rewrite each test (numbered 1 to 6) as proper unit tests
using JUnit assertions.
import java.util.List;
import java.util.ArrayList;

public class Main {
  public static void main(String[] args) {

    // test 1
    List<Integer> s = new ArrayList<Integer>();
    System.out.println(s.isEmpty());

    // test 2
    s = new ArrayList<Integer>();
    s.add(1);
    System.out.println(s.isEmpty());

    // test 3
    s = new ArrayList<Integer>();
    s.add(1);
    s.add(2);
    s.add(3);
    System.out.println(s.size());
    System.out.println(s.get(0));
    System.out.println(s.get(1));
    System.out.println(s.get(2));

    // test 4
    s = new ArrayList<Integer>();
    s.add(1);
    s.add(2);
    s.add(3);
    int elem = s.remove(2);
    System.out.println(elem);
    System.out.println(s.get(0));
    System.out.println(s.get(1));

    // test 5
    s = new ArrayList<Integer>();
    s.add(1);
    s.remove(0);
    System.out.println(s.size());
    System.out.println(s.isEmpty());

    // test 6
    try {
      s = new ArrayList<Integer>();
      s.add(1);
      s.add(2);
      s.remove(2);
    } catch (IndexOutOfBoundsException e) {
      System.out.println("IndexOutOfBound");
    }
  }
}
5. Students receive an A
in a course if they score 90 or
above. Consider the following function that verifies this
requirement:
boolean isScoreA(int grade) {
  if (grade > 90)
    return true;
  else return false;
}
The implementation of this function consists of three statements,
including one if, resulting in two branches. Now, answer
the following questions:
Does this function have a bug? If so, when does it produce a failure?
Suppose the function is tested with two input values: 85 and 95. What is the statement coverage in this case, and what is the branch coverage?
Consider the following statement:
If a program has 100% coverage at both the statement and branch levels, it is bug-free.
Is this claim true or false? Justify your answer.
6. The following function has four statements, including two
if statements, which create four branches:
void f(int x, int y) {
  if (x > 0) {
     x = 2 * x;
     if (y > 0) {
        y = 2 * y;
     }
  }
}
With this function in mind, complete the following table with the statement and branch coverage obtained from the tests specified in the first column. This column defines the function calls to be tested.
| Test Call | Statements Coverage | Branch Coverage |
|---|---|---|
f(0,0) |
||
f(1,1) |
||
f(0,0) and f(1,1) |
7. Complete the assert statements in the sections shown
below.
public void test1() {
   LinkedList list = mock(LinkedList.class);
   when(list.size()).thenReturn(10);
   assertEquals(___________, ___________);
}

public void test2() {
   LinkedList list = mock(LinkedList.class);
   when(list.get(0)).thenReturn("Software");
   when(list.get(1)).thenReturn("Engineering");
   String result = list.get(0) + " " + list.get(1);
   assertEquals(___________, ___________);
}
8. Consider two classes A and B, where
A uses B. To enable unit testing of
A, a mock class for B, called
BMock, was created. The unit test of A passes,
but the integration test of A and B fails.
Provide a realistic scenario where A, B, and
BMock are classes with methods performing specific tasks.
The scenario should include a bug in B that is hidden when
using BMock. In other words, B should have a
bug that only becomes apparent during the integration test.