
Software Engineering: A Modern Approach
1 Mutation Testing: A Practical Overview
1.1 Introduction
The concept of mutation testing was first proposed in a paper from 1978. To better understand the concept, the key point to remember is that a mutation test does not intend to detect bugs in the production code, as is the case with unit tests, integration tests, end-to-end tests, snapshot tests, etc.
Instead, mutation tests are used to evaluate the effectiveness of the automated tests that already exist in the system. Specifically, the assumption is that you already have a suite of tests and you want to know if they are effective, i.e., truly capable of detecting bugs and regressions.
To do this, a mutation testing tool makes small modifications to the production code, generating a version of the code referred to as a mutant. For example, mutants can be created through the following operations:
- Removal or duplication of a command or expression.
- Changing operators, for example, replacing an addition (+) with a subtraction (-).
- Inserting an operator, for example,
condbecomes!cond. - Changing a constant, for example,
TruebecomesFalse.
These mutations are made arbitrarily and, therefore, should introduce bugs. As a result, the existing tests should fail when run on these mutants. If this does not happen, we can conclude that the tests are not effective enough.
Mutation testing is a type of white-box testing, as its implementation requires knowledge of the internal code of the system’s functions. This internal access is necessary to generate the mutations.
The next figure—taken from a blog post
by Google—illustrates a real use of mutation testing. The gray
background message informs that a mutation was made in the expression of
an if command, changing a == b to
a != b. However, as also reported in the message, this
mutation did not cause the failure of any existing tests.
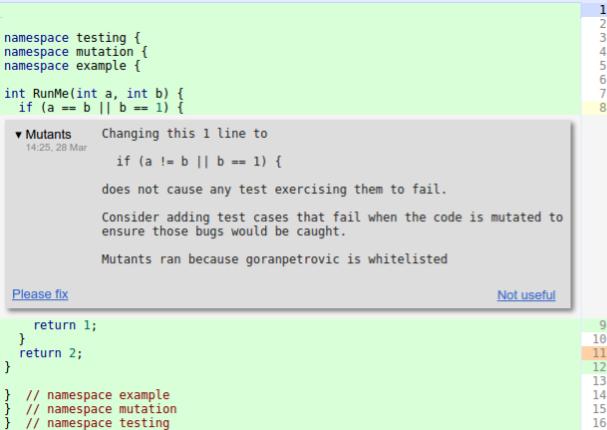
When encountering the above message, the developer should analyze the performed mutation and identify the system behavior that was compromised by it. Subsequently, they should write a unit test that exercises that behavior and, consequently, fails when executed on the mutant.
1.2 Mutation Score
The mutation score is a widely used metric in this type of testing. It is defined as follows:
mutation score = number of killed mutants / total number of generated mutants
A mutant is said to have been killed when it is detected by at least one existing test. In an ideal scenario, we would expect the mutation score to be 100%.
1.3 Mutation Testing Tools
There are several tools available for mutation testing. For Java, one of the most popular tools is Pitest, which implements several strategies to reduce the execution time of mutation tests. For example, Pitest performs mutations directly on the compiled code. This means there is no need to compile a mutant to determine whether it survives the existing tests or not. Furthermore, Pitest doesn’t run all the program’s tests to determine whether a mutant M is killed by the tests, but only those tests that execute M’s code.
1.4 Example: JFreeChart
JFreeChart is a Java library for constructing charts. Version 1.0.19 of the system has 47 KLOC and 1,320 tests.
The following paper analyzes the use of Pitest in JFreeChart. As described in the paper, when executed on the mentioned version of JFreeChart, Pitest generates 256K mutants in 109 minutes. The resulting mutation score is 19%.
This example highlights one of the main challenges of mutation testing: its high computational cost, even after all the optimizations implemented by Pitest. In a relatively small system (47 KLOC), nearly two hours are required to test all mutants.
Moreover, the achieved mutation score (19%) is low, suggesting that there’s significant room to write new tests for this system.
1.5 Equivalent Mutants
In specific situations, mutation operators can generate mutants that represent valid behavior, i.e., that do not introduce any bugs. These mutants are called equivalent mutants.
A simple example is a mutation in dead code, which is code that is no longer called by any part of the system. Another example is a mutant that removes a line that simply logs a message to a file. In this case, the removal of this line does not cause any test failures.
The issue is that, by definition, it’s not possible to kill equivalent mutants. Since they don’t change the behavior of the program, it’s not possible to write a test that fails when executed on them. In these cases, the best solution is to refactor the code to remove the situation that caused the generation of the equivalent mutant. For instance, we could simply delete the dead code, as it is no longer used in the system.
1.6 Final Remarks
Mutation testing can be viewed as the test of the tests. It is primarily useful when it’s important to have the highest quality and reliability in tests.
On the other hand, in many systems, developers are aware that the tests are not particularly effective. Often, they already know the parts and features of a system that need better test coverage. Therefore, in these cases, investment in mutation testing should not be a priority.
Exercises
1. Consider the following function:
def isGradeA(score):
    if (score >= 90):
       return True
    return False
Also consider the following test:
def test():
    assertTrue(isGradeA(95))
    assertFalse(isGradeA(85))
What is the statement coverage of this test?
Generate a mutant for the function that’s not killed by the test.
Modify the test so it fails with the mutant you generated.
2. Consider the following function that verifies if a bank client is VIP, depending on their balance and relationship time with the bank:
def isVIPClient(balance, time):
    if (balance > 10000) or (time > 10):
       return True
    return False
Now consider the existing test of this function (which has a statement coverage of 100%):
def test():
    assertTrue(isVIPClient(11000, 11))
    assertTrue(isVIPClient(10000, 11))
    assertFalse(isVIPClient(9000, 9))
When using a mutation testing tool, the following mutant was generated:
# mutant: first condition of the "if" was removed
def isVIPClient(balance, time):
    if (time > 10):
       return True
    return False
Notice that the presented test does not kill this mutant, i.e., it doesn’t fail when executed with the mutant.
Task: add one more assert to the test so that it now
kills the mutant.
- Consider the following class, in Java:
public class Client {
  public boolean isVIP (double balance) {
    if (balance > 10000) {
       return true;
    }
    return false;
  }
}
And the following unit test:
public class Test {
  @Test
  public void test1() {
    Client client = new Client();
    assertTrue(client.isVIP(15000));
  }
}
Now, consider the following output generated by the Pitest tool when run on the program with the previously presented class and test:
Negated conditional -> KILLED
Changed conditional boundary -> SURVIVED
Replaced boolean return with false for Client::isVIP -> KILLED
Replaced boolean return with true for Client::isVIP -> NO_COVERAGE
As we can see, four mutants were generated, two of which were killed, one survived, and the last mutant was not covered by the test.
Task: modify the unit test by adding one more assert so
that it kills all four mutants. Consequently, the new report generated
by the tool should look like this:
Negated conditional -> KILLED
Changed conditional boundary -> KILLED
Replaced boolean return with false for Client::isVIP -> KILLED
Replaced boolean return with true for Client::isVIP -> KILLED
Check out the other articles on our site.